Как играть в скайрим по сети с другом на пиратке
Содержание:
- Cell changing and Fast Traveling
- How Does Skyrim Co-op Work?
- Подготовка
- Appearance
- Гайд по настройке Skyrim и подключению совместного режима
- How to customize your server
- Работа с IP
- Загрузите Skyrim
- How to run as Administrator (Admin)
- Quests
- Добавьте Skyrim
- How to add Firewall exceptions (Windows Defender)
- Создание сервера
- Подробнее о том, как работает совместный режим в Skyrim
- How To Install And Play Skyrim Together
Cell changing and Fast Traveling
You are free to roam and fast travel to any cell you like. We don’t limit players based on distance or area. Players in the same area (cell) will be able to see each other and their actions, NPCs and world state will be synchronized.
When fast traveling to other locations or entering new areas, you will be the only one moving to that new location. Other players who are connected will have to manually travel with you to the same location. There is an in-game command that will allow you to teleport to other players in the same area and is used, for example,by typing “/tp PlayerName” within the in-game chat.
How Does Skyrim Co-op Work?
Skyrim does not have any co-op or multiplayer functionality by itself. Thanks to mods, this is now possible. The Skyrim Together mod allows multiple players to connect to a single instance through a server browser. Clients can host a local server that other Skyrim Together users can join. Passwords can be set to only allow friends into your game. A maximum of eight players can be in a lobby at a given time.
Since this mod is a work in progress, expect a few bugs and missing features. Most actions and items are synchronized, excluding leveled loot from chests, opening claw doors in dungeons, quest objectives (players need to progress each quest exactly the same to prevent bugs), and certain character-altering effects like Wabbajack don’t work.
If you are interested in playing split-screen co-op to remove latency concerns, you can use Skyrim Together in conjunction with the Nucleus Co-op Mod. This mod adds split-screen co-op for compatible games, Skyrim Together being a recent addition. With both mods installed, two instances of Skyrim should start. Have both instances join each other with different save files via Skyrim Together’s server browser. Click here for Skyrim Together’s guide on how to do this.
Подготовка
Итак, если вы хотите сыграть в «Скайрим» по сети, то вам нужно подготовиться к этому. У вас должен быть установлен на компьютере клиент для одиночной игры, для которого вам нужно скачать из сети модификацию, которая позволит вам опробовать режим онлайн. Если игра у вас еще не установлена, то вы можете скачать из интернета уже модифицированную версию, что будет гораздо проще. Также вам нужно скачать и установить специальную программу, которая позволяет вам имитировать сетевое подключение LAN. Таких программ имеется довольно много — самыми популярными среди них являются Tunngle, Hamachi и Evolve. Это специальное ПО, которое позволяет вам создать своего рода локальную сеть, притом что вы можете находиться на огромном расстоянии от других игроков. Когда все необходимое будет установлено у вас на компьютере, можно переходить к следующему этапу, который приблизит вас к тому, чтобы попробовать, что представляет собой игра в «Скайрим» по сети.
Appearance
You will be able to see a players’ race, gender, apparel and weapons. We advise against SKSE character overhauls as we cannot synchronize those; use at your own risk. Movement interpolation will take place to make movement and animations look as smooth as possible.
Custom races may work if you both have the mod, depending on the implementation of said mod.
Intense character editing such as vertex editing will not be synchronized, as that is functionality around the base game we cannot fetch using vanilla functionality. This might be possible in the future if the mod creators decide to implement our future API.
Гайд по настройке Skyrim и подключению совместного режима
Прежде чем вы сможете играть в Skyrim вдвоем, вам необходимо скачать:
- Обязательный файл, необходимый для корректной работы Skyrim Together.
- Harbour Launcher (мод Skyrim Together). Основной мод, который добавляет в игру возможность играть в мультиплеерном режиме.
- Nucleas Co-op launcher (дополнительно). Вспомогательная модификация. Скачивайте ее только в том случае, если вы планируете играть вдвоем с другом на одном ПК.
Важно! Чтобы запустить два клиента Skyrim и играть через Nucleas Co-op launcher, вам нужно иметь компьютер с хорошими характеристиками. На слабом ПК вы не сможете комфортно пользоваться двухоконным совместным режимом
Что нужно сделать, чтобы подключить мультиплеер в Skyrim:
- Сначала запустите на своем компьютере Harbor Launcher. Когда он попросит указать путь для распаковки файлов с последующей установкой, выберите любой вариант. Вы можете выбрать любую папку, не обязательно ту, где находятся файлы Skyrim.
- Когда установка завершится, запустите лаунчер Harbour. Подождите немного, пока он обнаружит файлы Skyrim на вашем ПК. Если процесс затянулся, щелкните значок лупы рядом с кнопкой «Установить», чтобы вручную указать местоположение файла SkyrimSE.exe.
Внимание! Если вы не знаете, куда установлен Skyrim, найдите Skyrim: Special Edition в своей библиотеке Steam. Щелкните по нему правой кнопкой мыши, наведите указатель на «Управление», затем нажмите «Посмотреть локальные файлы»
Так вы попадете в папку, где установлена игра.
- Перед запуском TES V через лаунчер Habour проверьте, установлен ли у вас Skyrim Script Extender. Установите SKSE, перенеся содержимое архива (все, что находится внутри «skse64») в корневую папку с игрой, где расположен файл SkyrimSE.exe.
- В игре выберите сохранение (должно быть сделано за пределами Хелгена). Нажмите ПКМ, чтобы войти в меню сервера. Вы можете присоединиться к серверу другого человека напрямую, используя его айпи-адрес, или осуществив поиск по названию сервера. Чтобы создать свой сервер, перейдите в корневую папку с игрой, найдите «server» и дважды кликните по server.exe.
Примечание: если вы видите сообщение, что libcrypto-1_1-x64.dll отсутствует, перейдите по этой ссылке и скачайте его. libcrypto-1_1-x64.dll нужно поместить в «серверную» папку. Альтернативный вариант решения проблемы – загрузка более старой версии Harbor Launcher.
3.1. Как играть в Skyrim с другом на одном компьютере?
Если вы планируете играть вдвоем с другом на одном компьютере через разделенный экран, вам нужно сделать все, что сказано выше. Дополнительно установите на свой ПК Nucleas Co-op launcher. Во время установки вы можете указать абсолютно любую папку, как и в случае с Harbor Launcher.
После того, как Nucleas Co-op launcher установился, запустите его и дождитесь, пока он найдет файл запуска Skyrim. Если вы видите уведомления об ошибках, убедитесь, что у вас есть 2 сохранения игры после побега из Хелгена и «журнал» внутри вашего файла сервера, чтобы Nucleus мог найти файл запуска игры. Как только он найдет вашу игру, запустите ее из лаунчера Nucleus, чтобы открыть два окна одной и той же игры на одном мониторе. После загрузите оба окна на один сервер, к которому вы можете подключиться по своему локальный IP-адрес или введя «127.0.0.1» в окошке IP.
How to customize your server
Step 1.
Navigate to your server folder, located in your Skyrim installation, which can be found by following the ‘How to find the location of Skyrim (Steam)’ guide, and keep the window open in the background.

Step 2.
Next, open your Start Menu’ and select the Start Button on the taskbar at the edge of the screen and then scroll down to ‘Windows Accessories’.
Once inside the folder, open ‘notepad’ by clicking on it.

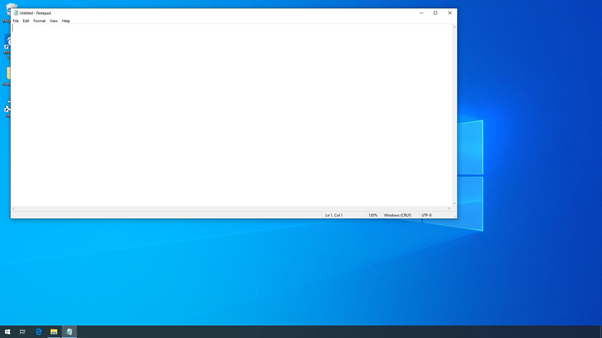
Step 3.
A blank window shall now appear, that will allow you to type into it.
Step 4.
Type `start server.exe` into it. This will make the server start when the file is created. This is the only entry that is required to start the server.

Step 5.
Adding ‘-premium’ will increase the tickrate of the server. This increases how often the server updates changes within the game, which should allow smoother gameplay if possible.

Step 6.
Adding ‘-port 10578’ will change the port the server uses to allow other players to join, this is the port you will enter when ‘Port Forwarding’ Without adding ‘-port’ the default is 10578, changing this is not required.

Step 7.
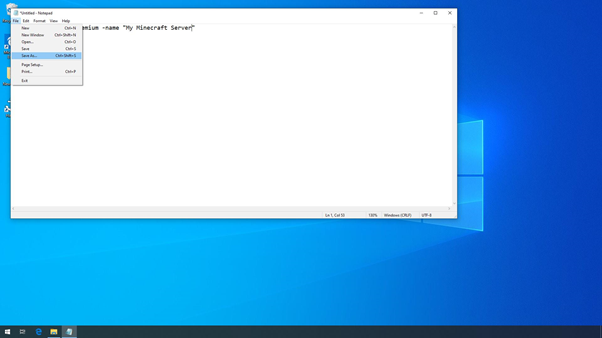
Adding ‘-name «NAME»‘ to the text line, will cause your server to appear on the Public server list in-game with the name you enter inside the «».
NOTE: This can not be used with ‘-token’ and will cause the server not to start.

Step 8.
Adding ‘-token TOKEN’ to the text line, will add a password to your server, this way even people with the server IP address can not join unless they know the token. NOTE: This can not be used with ‘-name «NAME»‘ and will cause the server not to start.

Step 9.
Once you have selected what you wish to enter, click ‘File’ in the corner of the window, and select ‘Save As…’
Step 10.
Once you have clicked ‘Save As…’ a new window will appear and allow you to save the Document.
On the bottom of the window, select the box labeled ‘Save as type’ and change it to ‘All Files’

Step 11.
Name the file ‘run.bat’ and click ‘Save’ It can be saved directly into your server folder, however it is unable to, save it somewhere you can and move it once saved, which is what Steps 12 to 17 will cover.
NOTE: It has to be saved as a .bat file.

Step 12.
If you have been unable to save directly into the folder, you will have to copy and paste the file, to do this Right-click the ‘run.bat’ file

Step 13.
From the right-click menu, click ‘copy’

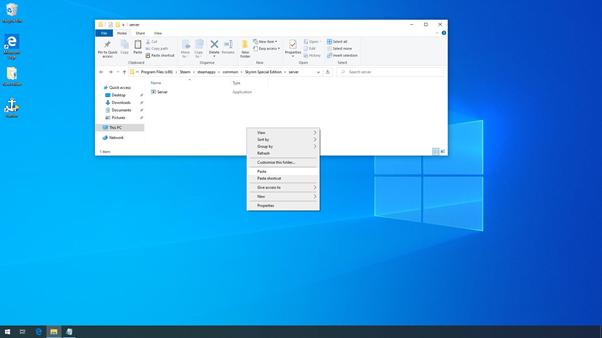
Step 14.
With the file copied, navigate to your server folder and right-click on an empty space.

Step 15.
In the right click menu, select ‘Paste’ and the file will be copied into the folder.
Step 16.
In some cases, a window labeled ‘Destination Folder Access Denied’ will appear, if this happens select ‘Continue’ You may also have to select ‘Allow’ or ‘Yes’ on a pop-up if one appears.

Step 17.
You should now have the ‘run.bat’ file in your server folder, ready to use.

Step 18.
Double click or right-click and ‘Open’ the ‘run.bat’ file.

Step 19.
The server will now start and you will be able to see your ‘token’ on the first line if you have previously set one.
NOTE:Do not click on the black window, as this may cause the server to stop working, pressing the ‘ENTER’ key or re-opening the server will fix this.

Работа с IP

Многие геймеры мечтали о том, чтобы появился проект «Скайрим Онлайн», многие ждали выхода отдельного мультиплеера, но все надежды оказались напрасными. Поэтому все, что вам теперь остается делать — это использовать данный метод. Чтобы создать собственный сервер, куда вы затем пригласите своих друзей, нужно сначала разобраться с IP-адресом, потому именно он будет ключевым во всем процессе. Вам нужно узнать свой адрес, и сделать это можно несколькими способами. Во-первых, это можно сделать через командную строку, в которой вам нужно вписать команду ipconfig. Появится приличное количество данных, среди которых вам нужно обнаружить строчку ipv4, в которой и будет содержаться ваш адрес, который потребуется для игры по сети. Также для этого можно использовать один из интернет-сервисов, которых сейчас существует более чем достаточно. Кроме того, IP для игры по сети можно создать самостоятельно — с помощью программы-имитатора, если у вашей версии имеется подобная функция. Итак, когда у вас уже будет готовый адрес, вы сможете сами, без помощи разработчиков создать себе «Скайрим Онлайн».
Загрузите Skyrim
Когда запущены оба экземпляра Skyrim Special Edition, оба игрока должны либо запустить свои собственные игры Skyrim, либо открыть существующие отдельные файлы сохранения Skyrim (если вы начнёте новую игру, вам нужно будет создать своего персонажа и пройти через обучение, чтобы присоединиться к игре другого игрока).
Чтобы присоединиться к одному локальному серверу, оба игрока должны нажать правую клавишу Ctrl на клавиатуре, когда их экземпляр игры выделен, затем нажать «Подключиться», ввести 127.0.0.1 в адресное поле и снова нажать «Подключиться».
Когда вы оба подключитесь к одному серверу, снова нажмите правую клавишу Ctrl, чтобы скрыть окно чата в каждом окне.
Как только это будет сделано, оба игрока появятся в том же месте, в котором они стояли в своих разных играх, но теперь вы оба будете в одном мире. Вам нужно будет вручную найти своего товарища по игре, поскольку на карте нет индикаторов, показывающих местоположение друг друга. К счастью, с разделённым экраном вы можете просто смотреть на экраны друг друга для поиска.
Конечно, для комфортной игры понадобится довольно мощный компьютер. Возможно, потребуется поменять настройки графики и разрешения, чтобы получить стабильную частоту кадров.
Во время игры вы наверняка заметите, что этот мод нуждается в доработке в некоторых областях, но играть всё равно интересно. Теперь, когда у вас есть Nucleus Co-op, стоит использовать этот инструмент, чтобы посмотреть, в каких ещё играх он позволяет разделить экран (всего их более 300!). Удачной игры!
How to run as Administrator (Admin)
Step 1.
To run as admin quickly from the shortcut or install location, right click Harbor.exe or Harbor — Shortcut, and click ‘Run as Administrator’

Step 2.
If prompted, select ‘Yes’ ‘to allow Harbor to run as Admin/Administrator.

How to always run as Administrator (Admin)
Step 1.
Similarly to the Run as Admin guide, right click Harbor or any Harbor shortcut, but then click Properties.

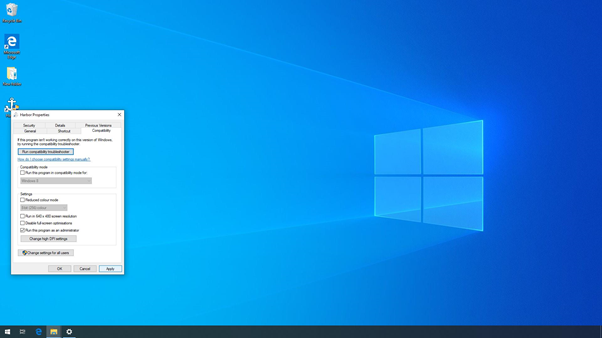
Step 2.
Once the Properties window has opened, click on the ‘Compatibility’ tab.

Step 3.
At the bottom of the Compatibility tab, under Settings, check the box for ‘Run this program as an administrator.
Once you have done this, click Apply or OK to save this setting.
This will now cause Harbor to always ‘Run As Admin’ you may be prompted to allow Harbor to make changes, click YES, when prompted.
Step 4.
This will now cause Harbor to always ‘Run As Admin’ you may be prompted to allow Harbor to make changes, click Yes, when prompted.

Quests
Quests will not be synced, until full release. If you want to quest together with your friend, then it’s strongly advised that you talk to the same NPCs and take the same choices. We let Skyrim handle the different choices that you, the player, make online. The current Nightly Build version of Skyrim Together does not support questing, it is very likely that saves corrupt, we recommend saving frequently and avoid questing altogether. If you do try to quest together. We recommend disconnecting before scripted events (the Whiterun Jarl walking towards the wizard for example) to reduce the chance of save corruption.
We do not know how quest events will happen if one player is further ahead than the other (or has made different choices), however instances of questing issues have been reported, due to missing or dead quest NPCs.
Добавьте Skyrim
Откройте Nucleus Co-op, нажмите «Загрузить игровые сценарии», затем введите Skyrim в поле «Игра» и нажмите «Поиск». Нажмите Skyrim: Special Edition, затем «Загрузить».
Нажмите «Да», когда вас спросят, хотите ли вы добавить Skyrim Together в Nucleus Co-op, а затем снова перейдите к своему SkyrimSE.exe.
Закройте окно загрузки игровых скриптов, чтобы вернуться на главный экран Nucleus Coop, затем нажмите Skyrim в верхнем левом углу. Нажмите на маленький значок в верхнем левом углу поля под геймпадами, чтобы выбрать, как вы хотите разделить экран.
Убедитесь, что ваши контроллеры включены, затем перетащите их значки, чтобы заполнить разделы, как показано ниже:
Нажмите на стрелку в правом верхнем углу Nucleus Coop, затем выберите, сколько экземпляров Skyrim (то есть сколько игроков) вы хотите. Когда будете готовы, нажмите «Играть».
На компьютере должны открыться два экземпляра Skyrim. Если вы получаете сообщение об ошибке, в котором говорится, что вам не хватает libcrypto-1_1-x64.dll, загрузите его с dll-files.com и поместите в папку server в каталоге установки игры (C:\Steam\steamapps\common\Skyrim Special Edition\server по умолчанию).
How to add Firewall exceptions (Windows Defender)
Step 1.
To get to the Advanced Firewall, you will need to go into the Start menu, which can be done by clicking the Start button on the Taskbar, the large bar going across the edge of the screen.
Step 2.
Once in the Start Menu scroll to the bottom or the ‘W’ section and open the ‘Windows Administrative Tools’ folder.
Step 3.
Inside the folder scroll down and select ‘Windows Defender Firewall with Advanced Security’
If prompted select ‘Yes’ if asked to allow ‘Microsoft Management Console’
Step 4.
Once the Firewall window is open select ‘Inbound Rules’
Step 5.
When you have selected ‘Inbound Rules’ you will be able to view all the rules Windows has created regarding your programs, however for this we will be right clicking on the ‘Inbound Rules’ button we clicked previously.
Step 6.
In the right click menu select ‘New Rule…’
Step 7.
A new window will appear called ‘New Inbound Rule Wizard’
Check ‘Program’ and then click ‘Next’
Step 8.
On the ‘Program’ page select ‘This program path:’ and click ‘Browse…’ to choose the file to allow.
You can find the location of your Skyrim folder by following the ‘How to find the location of Skyrim (Steam)’
Step 9.
Inside your Skyrim folder you will need to create rules for the following files:
SkyrimSE.exe
st_loader.exe
st_process.exe
Repeat steps 6 to 12 to do this.
On this page, when you are in the skyrim folder and have selected a file, click ‘Open’ then when back on the previous page, select ‘Next’.
Step 10.
On the ‘Action’ page check ‘Allow the connection’ and then select ‘Next’ .
Step 11.
On the Profile page, you will select which profile you will be using it on, normally on home internet it will be Private, if you wish to change it.
Step 12.
On the final page of the ‘Wizard’ you can name it and add a description, it is best to give it an easily recognizable.
Step 13.
Once you have finished adding rules they normally appear together at the top unless you click onto a different option. Once completed you should have a few rules created, the green ticks indicating that they are set to ‘Allow’
Step 14.
Steps 14 to 21 are a repeat of Steps 5 to 13 but for Outbound Rules.
Select ‘Outbound Rules’ and once the rules have appeared in the middle of the Window. Right click ‘Outbound Rules’ and select ‘New Rule…’
Step 15.
On the window labeled ‘New Outbound Rule Wizard’ ensure that ‘Program’ is selected and then click ‘Next’
Step 16.
On the following page select ‘This program path:’ and click ‘Browse…’ to choose the file to allow.
SkyrimSE.exe
st_loader.exe
st_process.exe
Repeat steps 6 to 12 to do this.
On this page, when you are in the skyrim folder and have selected a file, click ‘Open’
Step 17.
When back on the ‘Program’ page, having selected the file to add, click ‘Next’ to move onto the next page.
Step 18.
Now on the ‘Action’ page select ‘Allow the connection’ and select ‘Next’
Step 19.
On the ‘Profile’ page select which Profile the rule applies to, Home internet is normally set to Private. Then select ‘Next’
Step 20.
On the final page, enter an easily distinguishable name and select ‘Finish’
Step 21.
Repeat the previous steps for the different files you need to add, they will normally appear together unless the page is changed.
Создание сервера
Стоит отметить, что использование программы-имитатора, само собой разумеется, необходимо только в том случае, если между вашим компьютером и компьютерами друзей не существует локальной сети. Вероятность наличия такой сети, конечно, крайне мала, потому что сейчас они уже вышли из моды – такие сети, протянутые между несколькими, а иногда и десятками домов в одном районе, были популярны в начале нулевых. Сейчас же их можно найти в основном только в офисных помещениях, да и то не всегда, потому что интернет-соединение по скорости и качеству сейчас не сильно уступает локальной сети. Но если возвращаться к теме, то сейчас наступает важнейший момент. Имея на руках ваш адрес IP, вы отправляетесь в папку с игрой и открываете файл под названием TamrielOnline.ini (как текстовый документ). Там вам необходимо найти строку с текстом connectionip=127.0.0.1 – вместо этих цифр вам нужно вписать ваш IP-адрес. После этого запускайте игру (если она еще не была запущена) и загружайте своего персонажа (или же создавайте нового, но это занимает очень много времени, а ваши друзья ждут, поэтому о создании персонажей лучше позаботиться заранее). После того как ваш персонаж загрузится, нажимайте на кнопку Home, что приведет к созданию вашего локального сервера, где вы сможете играть с друзьями. Руководство запуска «Скайрим» по сети можно считать завершенным. Остается одна деталь – как вашим друзьям подключиться к созданному вами серверу?
Подробнее о том, как работает совместный режим в Skyrim
Как мы уже сказали в начале статьи, оригинальный Skyrim не поддерживает кооперативный режим или многопользовательскую игру. Но все изменилось благодаря модам. Skyrim Together – модификация, позволяющая нескольким игрокам подключаться к одной игре одновременно через выделенный для этого сервер. Пользователи могут самостоятельно создавать локальный сервер, к которому присоединяются люди, имеющие на своем компьютере Skyrim Together. При необходимости вы можете установить на сервер пароль, чтобы к вашей игре не подключились незнакомые игроки.
Обратите внимание! Максимальная вместимость лобби – до 8 игроков. Большее количество пользователей не поддерживается
Поскольку модификация находится на стадии разработки, готовьтесь к тому, что во время совместной игры вам будут встречаться различные баги, ошибки и отсутствующие функции. Меж тем, многие действия, предметы и опции синхронизированы, за исключением уровневой добычи из сундуков, открытия дверей в подземельях с помощью ключей-когтей, квестовых целей (игроки должны вдвоем проходить один и тот же квест, чтобы избежать ошибок) и т. д. Кроме того, некоторые эффекты изменения, включая эффекты от посоха Ваббаджек, не работают в мультиплеере.
Стоит сказать о том, что Skyrim Together поддерживает возможность игры на разделенном экране. Этот вариант исключает проблемы с задержкой (пингом) и подойдет тем, кто хочет играть вместе с другом у себя дома. Для этого Skyrim Together нужно сочетать с модом Nucleus Co-op. Больше информации о совместной игре на одном экране вы найдете в следующем разделе. , чтобы сразу перейти к нему.
How To Install And Play Skyrim Together
There are a few things you’ll need before you can play Skyrim cooperatively:
- Skyrim Script Extender (SKSE): Required for Skyrim Together. Download the current SE version.
- Harbor Launcher (Skyrim Together Mod): Adds online functionality to Skyrim. Download the latest version.
- (OPTIONAL) Nucleas Co-op launcher: Allows Skyrim Together to utilize split-screen. This requires a good computer, as you’ll be running two instances of Skyrim simultaneously.
Install the Harbor Launcher first. When the application asks for an install directory, choose wherever is most comfortable to you; it doesn’t have to be where Skyrim’s installed. When finished, boot up the Harbour launcher. It will need to detect your game. To do so, click the magnifying glass icon to the left of the «Install» button to manually search for your SkyrimSE.exe file. Once selected, Harbour will install Skyrim Forever for you.
Tip: If you have no idea where Skyrim is installed at, head to Skyrim: Special Edition in your Steam library. Right-click on it, hover over «manage,» then click on «browse local files.» You’ll be taken to your Skyrim install directory.
Before you launch Skyrim through the Habour launcher, make sure that Skyrim Script Extender is installed. Install SKSE by dropping its file contents (everything inside the «skse64» file) into your root Skyrim directory, the location your SkyrimSE.exe is located.
In-game, choose a save file that is not in the Helgen tutorial. Press right control to bring up the server menu. You can connect to a friend’s server directly by using their IP address or by searching for their server name. To host a server, find your root Skyrim directory, look for the «server» folder, then launch the server.exe file.
Note: If the executable states that libcrypto-1_1-x64.dll is missing, you can find it here. Drop that file in your «server» folder. Downloading an older version of the Harbour launcher can also work.
Split-Screen Co-op
Following the above steps is needed for Nucleus to work. As with the Harbour launcher, Nucleus can be placed anywhere on your computer. Install it, then boot the launcher up.
Note: If any antivirus software detects the .rar as malicious software, disable the warning and install Nucleus. One of the developers, ZeroFoxG, explains why this problem occurs. The program is not a virus.
It will need to find your Skyrim executable. If you get error messages, you must have at least two character save files past Helgen and a «logs» file inside your «server» file for Nucleus to find Skyrim. Once it detects your game, launch Skyrim from the Nucleus launcher to start two instances of the same game in split-screen. Have both instances load into the same server (you can join by using your local IP or by typing «127.0.0.1» in the IP field).