Nuclear reactor
Содержание:
Ядерная бомба[]
Ядерная бомба
| Тип |
Твёрдый блок, сущность (после активации) |
|---|---|
| Действует лигравитация |
Только после активации |
| Прозрачность |
Нет |
| Светимость |
Нет |
| Инструмент |
Нет |
| Возобновляемый | |
| Складываемый |
Да (64) |
| Воспламеняемый |
Да (Активация) |
| Первое появление |
IC v4.73 |
Активированная ядерная бомба
|
Нет |
|
| ID сетевой игры | |
| ID сохранения |
Ядерная бомба — самый мощный тип взрывчатки в IndustrialCraft 2. Поражает огромную площадь, при этом уничтожая 75 % выпавших блоков. Аналогичным эффектом обладает взрыв ядерного реактора при перегреве, однако реактор бьёт больше вглубь, чем на радиус. Активируется только сигналом красного камня или любым переключателем. Время до детонации 15 секунд. На слабых компьютерах взрыв ядерного заряда может понизить количество кадров. Даже на мощных компьютерах большое количество взрываемых ядерных зарядов вызовет падение производительности.
Может использоваться для облегчения обнаружения и/или добычи алмазов и других руд, в том числе и урана. Просто разместите атомный заряд на высоте примерно 15-20 блоков от коренной породы, и если у вас нет нано/квантового костюма, бегите подальше или сделайте укрытие из двух слоёв укреплённого камня, поскольку прочность обсидиана в моде IndustrialCraft 2 сильно уменьшена. Огромная подземная дыра обычно имеет на краях множество руд.
В папке имеется файл , его можно открыть с помощью блокнота. В файле имеется строчка
# Maximum Explosion power of a nuke, where TNT is 4
  explosionPowerNuke=35.0
Можно выставить значение на свой вкус, но с увеличением мощности усиливается падение производительности на сервере, вплоть до его падения. Оптимальным является параметр с по .
Начиная с версии 1.106, взрыв ядерного заряда оставляет после себя заражённую радиацией область. К любому игроку или мобу, зашедшему на неё, будут применены эффекты Отравление и Голод.
Ядерная бомба, взорванная рядом с иссушителем, отнимет у него около половины здоровья. Это серьёзно облегчает битву с ним. При правильной организации места призыва иссушителя с парой ядерных бомб он может быть быстро убит, но использование более трёх бомб избыточно, и при любом использовании ядерного оружия следует учитывать его последствия в виде значительных разрушений.
В экспериментальной версии ядерная бомба активируется с помощью лежащего посередине урана или плутония и лежащих по краям блоков промышленного ТНТ.
Крафт
В последних версиях рецепт крафта, как и сам блок, перенесен в разряд секретных.
| Ингредиенты | Процесс |
|---|---|
| Утолщённый отражатель нейтронов +Улучшенный корпус машины +Улучшенная электросхема |
Использование
В обычной версии ядерная бомба работает как обычный ТНТ (для активации её можно поджечь или дать сигнал красной пыли). В экспериментальной версии:
- В эти слоты помещаются промышленный ТНТ (ITNT). Количество ITNT в одном слоте будет продублировано в остальные. До 1 стопки на ядерный заряд.
- В этот слот помещается плутоний (как полный, так и кусочки) или различные виды урана. Плутоний в несколько раз мощнее, но мощность взрыва не зависит от использованной его формы. До стопки на ядерный заряд.
List
-
Thingy
- Best DFC core. Invisible to the creative menu and NEI. Still craftable.
- Sorta a secret, but many people know it exists at this point.
- Very Expensive, But well worth it. Allows for one if not the best power output and power to material ratio.
- ZOMG Cannon
- Negative energy super-weapon. Not invisible at all. Crafted using the assembly machine.
- Not really a secret.
- Very Good for destroying bases and things quickly, it’ll shred through any block necessary.
- Uses Euphemium Nuggets as ammo.
- Although it absolutely destroys everything it touches, high viscosity fluids (such as buildcraft oil) just delete it, due to it not having a propulsion of its own.
-
The Book Of Boxcars (aka Black Book)
- «Magic» book necessary to create Electronium. Invisible to both the creative menu and NEI. Can be crafted if Baby Mode is enabled. Otherwise, it can only sometimes be found in a Meteor Dungeon.
- Also can be bought from the hidden catalog or 100 caps.
- Not really a secret, since certain high-tier items need it in order to be made.
- Used to craft multiple special and bizarre items, including Boxcar Bullets, Metastable U-238-m2, and a few more.
-
Euphemium Armor
- Invincible armor, quite simply. Invisible to the creative menu, but not NEI. Can be crafted, though it is extremely expensive.
- Not a secret, everyone knows it exists.
- tile.#undef.name
- An indestructible statue that can be found in the Meteor Dungeon. Hidden from both the creative menu and NEI. You can give it a Cursed Revolver and a Broken Pocket Watch. It glows brightly.
- Actually kind of a secret.
- Gives the Regeneration effect when it is equipped with the pocket watch and a cursed revolver, similar to a beacon.
- The initials “ELB” are inscribed on the base. This is likely referring to the character Euphemia Li Britannia from Code Geass.
-
Meteor Dungeon
- A super-rare generated structure that contains many special items and areas.
- Not much of a secret at all in any sense of the term, it’s just rare.
- Spawns Every 15000 chunks or so.
- Broken Pocket Watch
- Used in Euphemium Armor, serves little purpose outside of that. Hidden from the creative menu, craftable.
- Not really a secret either.
- The Polaroid
- An item that does, things(?) Not hidden from the creative menu, craftable.
- It being readily available in the creative menu makes it one of the least «secretive» item on this list.
- Has multiple textures and writings at the bottom of it, it all depends on game/world load.
- item.memory.name
- A battery item that has an obscene amount of power storage. It was an item made to test batteries of extremely high capacities. It may be considered the item equivalent or predecessor to the FEnSU. It was usually used to test DFC configurations as Spark Energy Storage Blocks are insufficient for it. It is hidden from both the creative menu and NEI.
- Sort of a secret.
-
Locksmith Table
- Put a stick into the randomizer slot of a locksmith table, Guess what. It explodes.
- More of a joke/Easter egg, but sure.
- heh.
-
Ducks
- Some Chickens are actually NTM «Ducks».
- More of an Easter egg, as the beginning of the world says you can «Duck» by pressing «O».
-
NTM Dirt
- Right-clicking it with a brittle spade will make it drop the 3 «elements» needed to craft Metastable-U238.
- Sorta a secret.
- Can be bought from Hidden Catalog or found in the Meteor dungeons.
-
Fabulous Hat
- May or may not exist.
- Fabulous.
- Unique.
-
Hidden Catalogue
- Only (legitimately) obtainable by obtaining special achievement and completing the Secret Puzzle. Sells powerful items at a sharp discount. To spawn it in use «/give @p hbm:item.bobmazon_hidden»
- Sorta a secret, except lots of people know about it now.
- You Need the Level 6 NTM Achievement to buy anything.
- Bobcat
- Pink Log
- Oak log but with pink colored wood. Normal colored bark makes it indistinguishable from regular oak. Hidden from the creative menu and NEI. Has a 1/10000 of spawning randomly in trees instead of normal oak logs, it is only made in world generation, it cannot be grown. Needed to craft .
- A secret, but it can be found accidentally in recipes easily due to it being able to be used like regular wood and is needed to craft Gerald.
- Secret Air Strike Designators
- There are 3 secret air strike designators that you can get through commands. One is VT stinger rockets, it shoots multiple homing missiles. Another drops cloud in a line, and the 3rd drops boxcars in a line.
- Actually a secret
The Satellites
Orbital Death Ray
The orbital death ray is a satellite that lets you «summon» death rays with 15 seconds cooldown, those death rays play an animation then initiate a small N² Explosion and shoots out blue/purple energy projectiles for extra destruction, open the linked interface and a map will show near surroundings, left click to death rays the coordinate it shows.
Also, the ray will fall, impact, and stop at the first surface it touches, this means if you are inside a cave and then use this ray, it will not fall to your Y position bypassing all stone blocks, but will instead hit the surface.
Surface Mapping Satellite
It displays currently loaded chunks, that’s it. Open the satellite control interface and it will show you a basic map of them.
Xenium Resonator
Allows teleportation with no cooldown using a satellite designator linked to it. Does not support dimension jumping.
Asteroid Mining Ship
This one needs a cargo landing pad, this rocket periodically will come back to earth and return to space, it will deploy its cargo in the cargo landing pad, the items that it can give you are (all in the form of powder, unless otherwise specified):
- Vanilla materials
- Coal (very common)
- Iron (common)
- Lapis Lazuli (common)
- Redstone (very common)
- Diamond (common)
- Mod materials
- Fluorite (very common)
- Aluminium (very common)
- Titanium (uncommon)
- Copper (very common)
- Lead (common)
- Desh Blend (uncommon)
- Thorium (common)
- Uranium (uncommon)
- Plutonium (uncommon)
- Energy Powder (uncommon)
- Nitanium Blend (uncommon)
- CMB Steel (very rare)
- Crystals and Misc.
- Phosphorus Crystals (very common)
- Aluminium Crystals (uncommon)
- Tungsten Crystals (uncommon)
- Gold Crystals (uncommon)
- Lithium Crystals (semi-rare)
- Diamond Gravel (rare)
- Uranium Crystals (rare)
- Plutonium Crystals (rare)
- Trixite Crystals (very rare)
- Starmetal Crystals (very rare)
It is perhaps the most useful satellite in the mod.
(The landing cargo pad will require a satellite ID-chip with the same frequency as the satellite itself too.)
Trivia
- It has a small indentation in the middle of its ingot texture.
- Its block form sort of looks like a barrier block.
- Its block form’s name is «Reinforced Block of Desh», which is odd, as there is no non-reinforced Desh block.
- There is a Desh nugget in the mod, but it is not fully implemented yet as it has no crafting recipe or any uses.
- It is not radioactive whatsoever, which is interesting considering one of its primary component elements is Actinium, which is highly radioactive.
- Desh is possibly a reference to the Star Wars material. That type of Desh is also added by GalactiCraft. It can also be a reference to the Le Verrier space station in Doctor Who which is made of a red material (Aka Desh)
Since Desh in GalactiCraft is fairly easy to obtain, it used to be possible to «cheese» past NTM Desh processing thanks to OreDictionary, but NTM Desh’s OreDict registry was changed to maintain its place in progression.
.
- Desh is incredibly hard and overall durable, which is interesting because several of its components are actually rather soft.
-
It was implied by Bob (mod creator) that the major Actinium component is actually a type of catalyst and is somehow removed (and presumably destroyed) in the refinement process.This may account for why Desh is not radioactive.This leads to questions as to what happens to the Actinium.- Actinium is no longer a component of Desh.
Trivia
- After its rework, the cyclotron has fewer recipes than it did before.
- The Cyclotron appears to have 4 small tanks on its corners, presumably by the way they look: 2 for antimatter storage and 2 for coolant storage.
- Each side has a different symbol on it, see the gallery.
- The side with the «powder» symbol uses a silhouette of the powder texture used as a base for Energy Powder, Nitanium, Desh, Spark, and thermonuclear ashes instead of the typical powder texture for material powders.
- Placing in Thermonuclear Ashes, The Book of Boxcars, a Mask Man
It as originally supposed to unlock special recipes, but it never got to that point.
coin, and a Diamond Gavel in the respective slots activates an «enchanted» mode with a fancy render.
Fixed
- Fixed schrabidic acid and schrabidate recipes not having icons
- Black book recipes are no longer shapeless in order to fix a bug where no ore-dicted recipe can be used
- Fixed titanium filters exceeding the item meta and saving incorrectly
- Fixed HEV and AJR armor not working as faraday cages
- Fixed chain’s hitbox length not matching the texture
- Fixed 4 gauge claw shells operating incorrectly with entities that have 0 health
- Fixed 4 gauge wooden stake shells outright not working
- As a work around due to faulty server software, some anvil operations can now be done using the blast furnace
- Fixed guns that fire multiple round per cycle having negative ammo
Pros and Cons
+ Starter for nuclear power.
+ Can take any type of fuel rod.
+ Can make infinite coolant.
+ Can take in infinite water just by having water blocks next to it.
! Niter blocks will supply the reactor with infinite coolant, but you cannot have concrete bricks blocking radiation.
— Produces radiation when active, levels varying depending on the type of fuel rods inside, requires concrete brick covering to prevent radiation from coming out.
— Will violently explode when experiencing a meltdown.
— Does not directly produce electricity.
— Spent rods have to manually be removed and the other rods have to be rearranged.
Design Philosophy
The most important goals of any RBMK reactor is to generate energy whilst preventing a meltdown. Heat is necessary to produce steam in steam channels and heat is generated by fuel rods receiving and outputting neutrons. This means that the most optimal placement for steam channels is somewhere near the fuel rods of a reactor; ideally diagonally from them. However, since neutrons travel horizontally, and most fuel types require slow neutrons to react whilst splitting into fast neutrons, some thought must be placed into where the neutrons in your reactor are going and what type they are. Fuel rods should be placed horizontally from each other. Neutrons that reach the edge of a reactor are wasted, but reflectors can be placed there to reflect neutrons back into the fuel rods, increasing the efficiency of your reactor. If a fuel rod requires slow neutrons, moderators should be placed between it and any other source of neutrons, such as reflectors and other fuel rods.
An RBMK reactor utilizing absorbers.
Preventing a meltdown is important as well, since a destroyed reactor is not very useful. Making the fuel rods of a reactor too reactive or not having enough sources of cooling, will lead to the reactor overheating and causing a meltdown. The primary way to reduce reactivity is control rods; which will reduce the amount of neutrons passing through depending on how much of the rod is inserted. Control rods should be placed between fuel rods and other sources of neutrons, whether it be another fuel rod or a reflector. An alternate way is neutron absorbers. As seen in the example to the right, neutron absorbers can be used instead of reflectors to prevent these three fuel rods from becoming too reactive, since they are receiving plenty of neutrons from other sources.
Steam channels are important for cooling down a reactor. Boiling water into steam takes heat away from the reactor, and as such steam channels should be placed regularly and have enough water to be boiled, lest the reactor overheats. Similarly, since increasing the amount of components in a reactor increases passive cooling, there should also be enough additional columns in a reactor to provide a passive cooling effect.
Designs
There are more designs in the #rbmk-designs channel in the discord server.
(Note that some of these designs were made before critical RBMK fuel changes, and as such, might cause an immediate meltdown or not work at all. Please test the optimal fuel rods and power settings for them before use! This area will be updated soon with better reactor designs.)
DFC Components
Dark Fusion Core (DFC)
The core’s function is to increase the emitter beam’s power, generating insane amounts of HE. It needs 2 reaction catalysts and 1 DFC core to work, while being stabilized by the stabilizers, and having fuel in its reserve. When receiving a beam from the emitter, it activates, expanding and glowing in different colors depending on the catalysts inserted. The beam passing through the core can then be used with a receiver to channel the beam into HE, or with a tungsten crate to be used in Yharonite production. If a mob or player gets too close to the DFC while it’s running, it will catch fire and take high amounts of damage.
The core has 4 indicators: Fuel 1, Fuel 2, Restriction field, and heat saturation. When the restriction field reaches 0%, the core will melt down, leaving a crater larger than 500 blocks in diameter. Heat saturation is the amount of stacked emitters the core can process without melting down. When it reaches 100%, the core will also melt down.
DFC Emitter
DFC Emitter chain. The gaps are for demonstration, this can be done without gaps.
The emitter produces a beam, that upon penetrating a valid core, will increase the beam’s energy output. In order to store it, you will need the amplified beam to enter the DFC receiver. It needs cryogel and power to work, if it’s turned on without cryogel, it will melt to lava. It can also be stacked by chaining emitters, however, only 90% of the previous emitter’s power will be added. The beam does 50 damage and destroys any blocks it touches. Its energy output can be controlled, going from 1% to 100%.
DFC Receiver
The receiver catches a beam pointed towards its front face, and converts it into HE. It needs Cryogel to work, and will melt if it runs out of cryogel. Depending on the fuel and core, this will output energies beyond what a single spark energy storage block can hold per second.
DFC Stabilizer
The stabilizer ensures the core doesn’t melt down during operation. It needs power and a stabilizer lens in the lens slot to work. Like the emitter, its output can be set from 1% to 100%, higher percentages consuming more power.
DFC Fuel Injector
The Injector takes 2 fuels from connected pipes, and inserts them into the core. This component doesn’t require power, and the fuel can be changed using fluid identifiers. It doesn’t have any fluid container slots, so it can only be filled using pipes.
Tungsten Crate
While not required for the DFC’s operation, this can be used instead of a receiver for several purposes. One of them being as an instant furnace that processes items without delay which can be done with any setup. The other being for Yharonite production, although this needs an output of at least 10MSpk, which can be checked with a receiver. The crate can also be used without the core altogether, though this only works with a limited number of recipes.
Meteor Treasure loot
More information about this can be found in the loot tables page
The meteor treasure block has a high chance of spawning in most meteors and will drop 1-3 loot items when broken. Items that get dropped are randomized from a list of 36 items. These items are:
Super Conducting Coil, Advanced Alloy Plate, Desh Blend, Desh Ingot, Advanced Battery, Lithium-Ion Power Cell, Advanced Power Cell, Schrabidium Nugget, Plutonium Ingot, Ingot of Thorium Fuel, u233 Ingot, Reinforced Turbofan Blades, High-Speed Steel Ingot, Polymer Ingot, Tungsten Ingot, CMB Steel Ingot, Semi-Stable Lanthanium Ingot, Semi-Stable Actinium Ingot, Meteorite Block, Plasma Heater, Fusion Reactor Control, Watz Reaction Chamber, Rare Earth Ore, Superconducting Magnet, Reactor Control, Diesel Generator, RT Generator, Plutonium 238 Fuel Pellet, Weak Uranium RTG Pellet, RTG Unit, Electromagnetic Cartridge, Mini Nuke, Eightfold MIRV, Defabricator Energy Cell, Combine Ball, and Glitch.
Note: The glitch has plenty of its own effects, outlined in the glitch article. Use at your own risk!
Modular Design
The large 3 at the top of the GUI signifies the size of the reactor. This means that the reactor’s size can be expanded (up to size 15) so it runs much faster. The reactor control computer must preferably be in the middle of the reactor, with up to 7 layers below and 7 above and one in the middle, totaling 15. If you don’t want it like this, you can just expand on the default size upwards and have up to 9 layers.
With the increased size, the reactor runs much faster, which means it consumes its fuel faster and produces energy faster. All of its buffers increase in size too (water, fuel, etc).
Comparison: Largest (15), Normal (3), Smallest (1).
Reactor Stats
| Reactor Size | Water | Coolant | Steam | Fuel/Waste | Consumption Rate |
|---|---|---|---|---|---|
| + Per size | 128,000 | 64,000 | 32,000 | 240 | N/A |
| 1 | 128,000 | 64,000 | 32,000 | 240 | N/A |
| 2 | 256,000 | 128,000 | 64,000 | 480 | N/A |
| 3 | 384,000 | 192,000 | 96,000 | 720 | N/A |
| 4 | 512,000 | 256,000 | 128,000 | 960 | N/A |
| 5 | 640,000 | 320,000 | 160.000 | 1200 | N/A |
| 6 | 768,000 | 384,000 | 192,000 | 1440 | N/A |
| 7 | 896,000 | 448,000 | 224.000 | 1680 | N/A |
| 8 | 1,024,000 | 512,000 | 256,000 | 1920 | N/A |
| 9 | 1,152,000 | 576,000 | 288,000 | 2160 | N/A |
| 10 | 1,280,000 | 640,000 | 320,000 | 2400 | N/A |
| 11 | 1,408,000 | 704,000 | 352,000 | 2640 | N/A |
| 12 | 1,536,000 | 768,000 | 384,000 | 2880 | N/A |
| 13 | 1,664,000 | 832,000 | 416,000 | 3120 | N/A |
| 14 | 1,792,000 | 896,000 | 448,000 | 3360 | N/A |
| 15 | 1,920,000 | 960,000 | 480,000 | 3600 | N/A |
Uses
Its ingot and compound plate forms are what are primarily used, but its powder and unrefined blend form can also be used.
It is used to make tools. While the tools don’t have a harvest level any higher than iron, they have the advantage of being completely unbreakable. These tools can then be upgraded into Schrabidium tools which gives them numerous abilities, at the cost of them being no longer indestructible.
It is used in various mid-late game machines to make them much tougher. One missile fuselage can even be plated in Desh to increase its HP.
Unrefined Desh blend has 2 uses: the Desh Dynosphere and a Radiation Absorber upgrade.
Compound plates with Schrabidium nuggets can be used to upgrade a CMB Steel shredder blade into an indestructible Desh one.
It is used for production.
A Desh stamp for use in Presses is currently being worked on as an indestructible stamp. Low priority, so it will take a while to be added, if at all.
Compound Plate Recipe
Desh cannot be stamped, so it has to be made into a compound plate instead in one of the Anvils:
- 2 Desh Ingots
- 2 Polymer Powder
- 1 High-Speed Steel Ingot
(Produces 4)
General Run Down
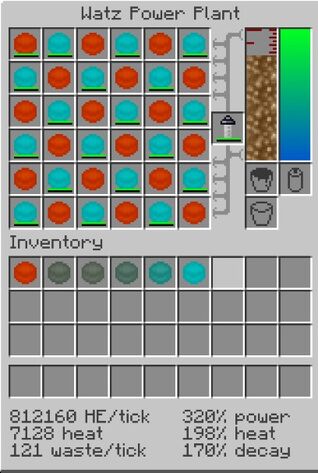
The Watz Power Plant needs pellets and a Titanium Filter to work, every pellet has his own statistics like max-age (how many ticks the pellet lasts at a maximum), power per tick (how much power it generates every tick), power multiplier (multiplies the power generated with each pellet), heat provided (how much heat the pellet generates, which effects waste per tick), heat multiplier (multiplies the heat generated with each pellet) and decay multiplier (multiplies the decay rate for every pellet in the power plant).
Emergency ejection
When a pellet reaches its end of life and depletes, it turns into a lead reflector and begins the cycle again. These lead reflector pellets turn into lead powder when they themselves deplete.
If the Poisonous Mud internal buffer of the power plant is full, the power plant will automatically eject the waste trough a random access hatch.
Typical «meltdown»
The Watz Plant has no maximum heat limit, but since heat also correlates with waste production, you may want to keep it down to prevent waste overflow.
If the waste overflows even emergency ejection, it will completely break off its casing from the overflow and leak mud all over the place. However, there is a small chance that the Watz will explode into a Fölkvangr Field like a F.L.E.I.J.A.
Changed
- Updated russian localization
- The radiation generator’s template now uses a seperate icon. In the future, this type of template will not be creatable with the template folder.
- HEV armor is now fireproof
- Assemblers will now show the item being made inside the glass dome
-
Reworked all jetpacks
- All jetpacks now hold more fuel
- Jetpacks are now used with space instead of the sneak key
- The particle effects of the jetpacks have been overhauled
- The vectorized jetpack now steers a lot nicer
- The «breakpack» has been turned into the builder’s jetpack which is similar to the regular jetpack but comes with an automatic hover ability
- The boostpack, more true to its name, now behaves like the vectorized jetpack but much, much faster
- The boostpack also uses BF fuel now and can no longer be refueled with the reserve tank
-
Overhauled small nuclear explosions
- The particles have been completely reworked
- Most mini nukes now use a different system that is less overpowered and less laggy
- Some players might experience a new, experimental immersive recoil effect which will tilt the screen subtly when using weapons
- Changed all jetpack recipes to be generally cheaper
- Electric armor will no longer use passive energy when used in creative mode
- All handheld nuclear launchers now have their first-person render size doubled
- Tier 2 and 3 hazmat helmets now work as safety goggles
- Recipes have changed to use the new mini nuke variants
- Rare loot chests will now spawn mini nukes more frequently with the lower-tier variants
- The supershotgun now has a texture
- Changed the gerald recipe to use all four coins
- CMB armor has been highly buffed, it’s damage cap is now on-par with schrabidium and its general modifier is now twice as good (5%)
- CMB armor also gives damage boost 5 and haste 3 (instead of 1)
- Weapons what do not use up ammo can now be unloaded to prevent being stuck with one ammo type only. To do so, press the reload key while sneaking. Note that this will not return the loaded ammo.
Крафт добавляемый плагином NuclearMC:
Атомная бомба
Железный блок, Ядро реактора, Железный блокЖелезный блок, Топливный стержень, Железный блокЖелезный блок, Фейерверк, Железный блок
Топливный стержень
Железный слиток, ОБОГАЩЕННЫЙ УРАН, Железный слитокЖелезный слиток, ОБОГАЩЕННЫЙ УРАН, Железный слитокЖелезный слиток, ОБОГАЩЕННЫЙ УРАН,Железный слиток
Водородная бомба
Железный блок, Ядро реактора, Железный блокЖелезный блок, Звезда незера, Железный блокЖелезный блок, Фейерверк, Железный блок
Ядро реактора
Железный блок, Редстоун, Железный блокРедстоун, Алмазный блок, РедстоунЖелезный блок, Редстоун, Железный блокУрановая рудаПолучено в результате полезных ископаемых
Usage
Example Cyclotron GUI
The compatible elements for boxes are: Lithium, Beryllium, Carbon, Copper, and Plutonium. They are made in the assembly machine combining one powder with one insulator.
Many of the elements produced have very few uses, usually for Nitanium production or being an intermediary step for another rare element, such as one of the Rare Earth Elements or trans-schrabidic super heavy elements, notably Australium.
Due to the expense of running, it should only be used for very rare elements (for further use in Nitanium or Desh for example) or Antimatter.
Although if you can afford to run this machine consistently (possibly utilizing a mining ship), you can use this machine as a stand-in for an energy-matter fabricator (think the replicator from Star Trek), though that would be purely for flex material as it is not sustainable in any sense.
The cyclotron can store up to 100 MHE and 32,000mb of coolant. Power is consumed very quickly at 690 million HE consumed per operation. Use all three slots at once to be most efficient. A Schrabidium Energy Storage Blocks at the minimum should suffice for a few operations. Coolant is consumed quite slow, so you don’t have to worry about that.
If it runs out of coolant, it will enter an overheat phase and shoot sparks and shrapnel all over. You have around a minute of continuous operation until it completely overheats and explodes into either: a mini-nuke explosion, a Balefire explosion, or spawn a black hole.
Antimatter and Antischrabidium
Antimatter is produced as a byproduct of operation, heavier element boxes produce more antimatter. The cyclotron has 8,000mb of internal storage for antimatter.
Antischrabidium is produced by bombarding an Antimatter cell with Plutonium.
Mechanics
Neutrons
Neutrons are what make fuel split and heat up. Neutrons are generated by fuels marked as self-igniting are in a fuel rod or when fuel is impacted by the right neutron type. Fuel has a tooltip which shows which neutron type it needs to split, as well as what type it splits into. Neutrons only travel horizontally and follow a straight path until they reach another fuel rod or a reflector. Self-igniting fuels generate neutrons automatically, and can react with itself; too many self-igniting fuel rods can lead to a meltdown.
Neutron source rods are a «special» type of self-igniting rod, they do not fission and do not produce a lot of heat on their own. They also deplete quickly, so you should remove it and replace it with a regular fuel rod once the reaction has started to be most efficient.
Heat
Fuel rods, when experiencing fission, generate heat. Heat is transferred to adjacent components, and can be used to generate steam for power generation. Components also gradually cool down through passive cooling, which increases depending on how many components your reactor has. This means you should be careful with adding too many structural columns, as it could cool the reactor down beyond any usable temperatures.
Xenon Poison
Xenon-135 is a common product resultant from fission reactions, which can build up in the fuel rods of a reactor and act as an undesirable neutron absorber. Simply put, this is something that slows down fuel reaction when you don’t want it. Xenon «burns» away at higher power, so if your reactor can output enough neutrons, you shouldn’t worry much about it. It may be problematic if you wish to run your reactor at low power however, as it may drop the reaction too much or halt the reaction entirely.
Fuel Temperature
When fuel reacts, it generates heat, which is shown as core and skin temperature. As stated before, core temperature doesn’t matter too much, as it can be way higher than the skin temperature which is what transfers to the fuel rod block. Skin temperature is almost always higher than the reactor temperature even if you have good cooling due to heat transfer. As long as the skin temperature is nowhere near the melting point of the rod, you should be fine.
Meltdown
RBMK meltdown mid-explosion. Notice the debris flying out.
Probably the most interesting part, a meltdown is when things get out of control and the reactor literally melts. It happens when the skin temperature gets past the melting point of a given fuel, or when a reactor component’s temperature reaches more than 1500 ºC. It explodes violently, releasing debris and high amounts of radiation into the environment. Debris can be collected by hand and will give you the respective debris item. They can’t be processed yet, and are just waste for now. After a meltdown, Corium replaces the fuel rods and is highly radioactive, while regular RBMK debris variants replace the rest of the components. Corium solidifies over time, turning into corium blocks which are fatally radioactive in seconds; cleanup is extremely difficult until they have decayed as a result. Reactor Corium and Sellafite-Corium are not to be confused.
The Burner Press
The burner press uses (as the name implies) combustible materials (i.e. furnace fuel) to press ingots. Since ingots can be pressed into many different shapes, you need to make a demountable piece that helps the metal become the shape you want it to: The stamp. Flat stamps can be crafted with a desired material (for example, iron), some bricks and a pile of redstone dust. While a flat stamp does have some uses, they aren’t all that important, hence why we are going to upgrade it a little. For that, open your trusty template folder and select «Plate Stamp» on the first page, with the plate stamp’s material matching the one of the flat stamp you have just crafted. Voilà, you have created a stamp, ready for use! Now fire up your burner press, wait for the gauge to hit the yellow area, put the stamp on the top and some copper at the bottom, and now the magic starts: You have made yourself your very own copper plates. Note that even when idle, the press will burn fuel, so either remove unwanted fuel when not in use or use a lever to «pause» the press. Note that the temperature gauge will rise as long as fuel is burning, the hotter the press, the faster it will go. Don’t worry, the press will stop heating up if the maximum is reached, it cannot overheat.
Pros and Cons
+ Good succession for the regular reactor.
+ Does not require rods.
+ Depleted fuel is automatically removed.
+ The operating level can be changed to something between 0-100%.
+ Somewhat modular in design
! Can only take one fuel type at a time.
! Needs somewhere to eject the depleted fuel.
! Schrabidium Fuel takes up more space than other fuels. (1 Nugget = 10ng)
! Requires Zirconium in the reactor chamber recipe
— Incompatible with the breeding reactor.
— Requires lots of coolant which cannot be made infinitely like the small reactor.
— Needs concrete brick coating to prevent radiation leakage.