Pride before a fall
Содержание:
References
- See «Behind the scenes of Dragon’s Dogma»
- From pawn conversations in the post dragon everfall
- Early conceptions of the world included a moon. See «Behind the scenes of Dragon’s Dogma». There are also references to a moon in placenames, such as Moonsbit Pass, Moonshower Cliffs, and The Bluemoon Tower, making the absense of a moon in the night sky even more odd.
- Early versions of the world story included a battle on the Moon, which was also to be the abode of the «Guardian» (Seneschal). See «Behind the Scenes of Dragon’s Dogma».
- The great Dragon on Death speaks deus ultra astrum (latin: ‘God beyond the stars’)
- An ‘Elven haven» is referred to beyond the witchwood. See «Behind the scenes of Dragon’s Dogma»
- From Mercede’s Tale
- ↑ From Aelinore’s Tale
- ↑ Gran Soren (Capcom, Youtube) Around 250 years ago the Liogran Peninsula was divided into Liore in the west and Gransys in the east. The dukes of each region were forced to answer to officials sent from the mainland. Not long after, Gran Soren was named the capital of Gransys.
- See the description in Set of Voldoan Armor.
- Based on early descriptions of the world. See «Behind the scenes of Dragon’s Dogma»
- ↑ From Edmun’s Tale
- From the Adaro’s Tale
- Inference: The Grand Cathedral of the Faith is located in Auldring on the mainland, and is of higher importance than Gran Sorens Cathedral
- Based on the narrative of Savan’s story — see Comic : 1. City of Viete
- ↑ From the novel Dragon’Dogma : The Beginning
- Based on early conceptional maps of the island. See «Behind the Scenes of Dragon’s Dogma»
-
- ドラゴンズドグマオンライン文字翻訳6 ameblo.jp
- 【DDON】ソーサラーの詠唱の豆知識 ddon-rion.blog.jp
- ↑ Pawn testament on the purpose of Catacombs, Watergod’s Altar, and Bluemoon Tower.
- Based on the elevated position of the upper platform of the structure, and the statues of the flying Griffins; inference made from the assumption (from known earth and water deities) of a group of gods each controlling a natural «element». Pawns comment that the upper appear to be suitable for temple use.
- See
- ↑ From the Elysion’s Tale
- — on Eternity — Each beast, each blade of grass, each human life is born to die and be born again in endless rhythm
- Seneschal (at the resolution of final battle between Seneschal and Arisen) : Arisen… Forgive me. All I’ve done was to test your will. It is the fate of all Arisen… You and I are swept up in the current, same as the rest. Each tempers the volition of the next, and the endless cycle continues.
- Seneschal — on will — And so the dragon is sent into the world to guide the Arisen, and refine them. To temper their wills into aught capable of sustaining the world
- Seneschal — on the Seneschal — The Seneschal is steward to the world… The world you traveled now rests in your care. Just as the Arisen calls pawns into being and sets them to motion, the Seneschal holds dominion over all living things. There are those who would call such a being Maker, or God. I cannot deny the claim, any more than affirm it. In the end, they are but words.
- Passing references in Edmun’s tale
- From the Dragonforged’s tale
- Comic : 1. City of Viete
- Comic : 2. Barta Crags
- Comic : 3. Estan Plains
- ↑ Comic: 4. The Cursed Mountain
- Dragon’s Dogma — Prologue quest : «The End at the Beginning»
- The dead Arisen then becomes the servant of the Seneschal. See Servitude
- This is made explicit in the story of Dark Arisen, specifically in the account of an Arisen who fell in battle with the Seneschal; see Grette and Grette’s Account.
- Mentioned in passing the Elysion’s Tale
- The Tower of Bable Peter Breughel the Elder (1563)
- The Twilight of the Idols, Or, How to Philosophise with the Hammer; the Antichrist; Notes to Zarathustra, and Eternal Recurrence , Volume 16 of ‘The Complete Works of Friedrich Nietzsche’, translated by Anthony A. Ludovici (1911) p.250
- Dragon’s Dogma Has Guts, The Berserk Character (Siliconera, 16 Feb 2012)
- Behind the Scenes of Dragon’s Dogma (GDC, 2013)
Loot
The temple is quite rich in useful items including weapons and armor. Additionally, several Ore deposits may yield Priceless Artifacts, which are unique to this area. Also found only here are Waterfell Gentian Leaves and Waterfell Gentian Roots both from the same plant species.
Chests
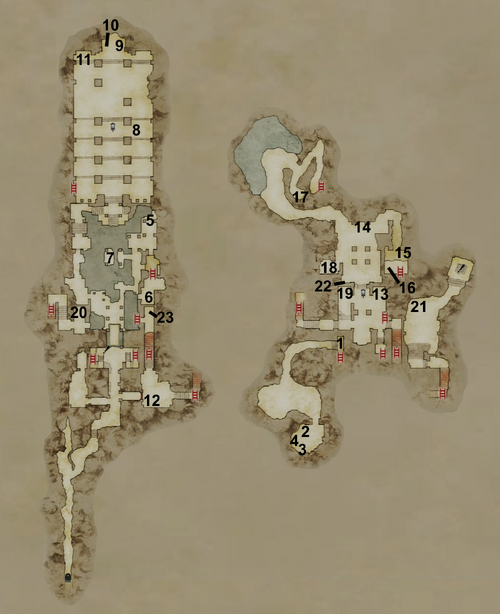
There are five chests holding Altar Slates, and another holds the Watergod’s Altar Lever.
- Note, some chest loot incomplete
| Map
|
|||
|---|---|---|---|
| Chest | Loot | Chest | Loot |
| 1 | Eden’s Warden, Thunderclap, Grievous Horns, Demon’s Periapt | 13 | Altar Slate |
| 2 | Ferrystone, Dragon’s Spit, Giant Coin Pouch | 14 | Cleansing Earring, Golden Ring |
| 3 | Bronze Gauntlets, Silver Bands | 15 | Cyclops Strategy Vol. 2, Serenity Extract |
| 4 | Watergod’s Altar Lever | 16 | Tiger Bangle, Iron Boots, Winter’s Path Tome |
| 5 | Iron Helm, Bronze Cuirass, Dragon’s Spit, Panacea, Golden Egg | 17 | Altar Slate |
| 6 | Altar Slate | 18 | Altar Slate |
| 7 | Iris Ring, Ring of Azure | 19 | Missionary’s Robe, Hunter’s Jacket, Conqueror’s Periapt, Interventive |
| 8 | Padded Armor, Battle Greaves, Cleansing Earring, Large Coin Pouch | 20 | Altar Slate |
| 9 | Light Outfit, Chainmail Bracers, Violet Ring | 21 | Obliteratrix, Direwolf Bow, Surcoat |
| 10 | Red Leather Cap, Twilight Hood, Ring of Purpure | 22 | (on a broken wall betwen upper and lower levels)Padded Armor, Silver Ring, Panacea or thrown explosives. |
| 11 | Blast Arrow, Blinder Arrow, Harspud Milk, Gold | 23 | Tiger Bangle, Iron Boots, Light-Cure |
| 12 | Scale Greaves, Blue Longkilt, Martyr’s Talisman, Saurian Tactics Vol. 1, Liquid Vim | ||
| Weapon Piles and Gather Spots | |||
|
In the Offering Chamber:
In the room beyond the magick door opened by the Watergod’s Altar Key : A Weapon Pile may yield : Liquid Vim, Salubrious Brew, Harspud Sauce, or Interventive by day; by night an Iron Shield is common, and Rusted Daggers, Silver Ring, or Foreign Knife may be found. |
Overview
I am but a wandering merchant. And yet I witnessed something absolutely incredible with my own two eyes! Behind a giant waterfall there is an entrance to a secret cave! Etched on a stone nearby was an ancient emblem, perhaps a symbol for one of the old gods. I remember my mother once told me that the Watergod is one of the gods worshipped by an old religion long before our time in the region of the Pike. The altar looks man made, built around the flow of water. I heard strange noises afoot down there, and I will not return for fear of the creatures who may reside beyond. My curiosity is strong, but not so strong as to blind me to the fact that whatever lurks within the altar is not interested in buying what I’m selling.
Reynard
The Watergod’s Altar is a cave and temple complex behind the Man Swallowing Falls. It is located to the west of The Mountain Waycastle. The system consists of seemingly natural tunnels, many of which have running water throughout, plus a decayed two-levelled temple within the mountain.
Initially the lower level is flooded and must be drained in order to explore the entire area — a task usually undertaken in conjunction with the eponymous quest The Watergod’s Altar. The lower level is accessed by stairs and ladders, as well as a raisable and lowerable drawbridge, operated by the Watergod’s Altar Lever — at the approximate centre of the lower level is Water’s Bottom.
At the far end of the temple area is a large pillared hall, known as the Offering Chamber.
It seems that this temple is much decayed — walls are broken down, the floor of the upper central chamber has collapsed into the lower area around Water’s Bottom. There are also signs of rough tunnelling, such as leading from Water’s Bottom through a largish cavern up to the Offering Chamber through a broken hole in that chamber’s walls. It is not known what created these tunnels — either man, beast, or natural forces.
Inhabitants
The upper tunnels and initially unflooded parts are infested with numerous Giant Bats, Rats, Snakes and Saurians, as well as Skeleton Mages, Skeletons, Skeleton Knights and a pair of Sulfur Saurians — the far Offering Chamber is home to a large Cyclops.
Draining the initially flooded area centred on Water’s Bottom will reveal further Skeleton Knights, Skeleton Mages, and Phantasms. A natural side cave in the lower levels contains a small Cyclops. Prior to draining the lower levels, the water is deep enough to be home to the Brine.
In Post-Game, the large Cyclops in the Offering Chamber is replaced by a Wyrm.
Notes
- While walking to the Windbluff Tower from Gran Soren, three Gran Soren soldiers (Ser Tulius, Ser Rustom, and Ser Morrison) can be found across the bridge observing a dead Cockatrice. This foreshadows a later quest.
- It is possible to both receive Julien’s Wizard’s Vizard and have Mercedes as one’s romance. The player must encounter Julien after receiving the magick shield and lower his affinity by attacking him or giving him Liquid Effluvium.
- Completing this quest and The Wyrmking’s Ring will automatically start the next Royal Orders Quest called Honor and Treachery.
- Ser Antonio, Ser Cashew, Ser Nevitt, Ser York and Estoni accompany Ser Mercedes in this quest, while Ser Macklyn and Ser Palotti serve as reinforcements.
Trivia
- «Ophis» is the Greek word for «Serpent». No doubt this name was chosen to symbolize how thieves surreptitious and deadly behaviors are reminiscent of a snake’s own predatory nature.
- According to Betiah, a member of the gang, Ophis likes beautiful women. However Betiah also mentions that a feminine-looking male might also catch her eye, alluding to the Set of Lady’s Garb that most males will need to wear in order to speak to Ophis.
- Even more so, in junction to Betiah’s words, Ophis herself states that: «I’ll not mind dying…so long as there’s prey and pretty girls in the life after.»
- She has a non-hostile Cyclops as a pet, located in Ophis’ Domain. It will not respawn if killed.
Notes
- Though unlike normal Armored Cyclopes, these enemies’ body armor cannot be torn off or rent asunder. The creatures actually do lose armor pieces occasionally when they fall. Just like with normal Armored Cyclopes, the rent pieces spawn loot bundles containing Rusted Plate, Scrap Iron or Iron Blade Piece. The creature’s defenses and Stagger/Knock Down Resistance lower as it drops armor pieces too(verify).
- In the Midnight Helix the Gorecyclops may fight with a Cursed Dragon if the party hides from both. They will fight to the death and the party can claim the rewards.
- The term Prisoner Gorecyclops is used in the stat menu kill count, and in quest logs. In official (japanese) press releases it was referred to as 【サイクロプス ~Prisoner Cyclops~】 where 囚人 (Shūjin) means prisoner and クロプス (saikuropusu) is a transliteration of the greek term cyclops, foreign to japan. The origins of the commonly used term ‘condemned gorecyclops’ is unclear, but ‘condemned’ may be an alternative translation of 囚人 .
- (Exploit) Finding a «safe space» (such as near an exit) and saving and reloading will reset the gorecyclop’s state excluding health, and will re-chain any that were initially chained. Also useful to «re-roll» a near-death gorecyclop’s loot drops.
- (Exploit) Exiting and re-entering to chained Gorecyclops allows it to be repeatedly stolen from with Master Thief.
Advanced Vocations
Advanced Vocations become available once the character reaches Level 10. New vocations can be chosen either with Asalam at the Union Inn, or in Dark Arisen, with Olra at Bitterblack Isle Harbor.
Warrior
The Warrior is more offensively oriented than the Fighter, with less stamina and more Health. Warrior is second only to Mage in terms of low cumulative Stamina growth, which is an offset for high Health and Defense growth.
| Health | Stamina | Attack | Defense | Magick Attack | Magick Defense | |
|---|---|---|---|---|---|---|
| Lv10+ | 40 | 10 | 5 | 3 | 2 | 1 |
| Lv100+ | 5 | 15 | 2 | 2 |
Note: The official strategy guide lists the Health growth for warrior level 100+ as 15 Health; but in practice it is 5 Health 15 stamina per level at level 100+.
Ranger
The Ranger foregoes the Strider’s balance for more Stamina and Attack but less defense and health. This vocation has the highest cumulative Stamina gains out of all vocations.
| Health | Stamina | Attack | Defense | Magick Attack | Magick Defense | |
|---|---|---|---|---|---|---|
| Lv10+ | 21 | 30 | 4 | 2 | 3 | 2 |
| Lv100+ | 5 | 15 | 2 | 1 | 1 |
Sorcerer
The Sorcerer has the highest cumulative Magick Attack gains out of all vocations, which is paid for by low stamina, defense and Health.
| Health | Stamina | Attack | Defense | Magick Attack | Magick Defense | |
|---|---|---|---|---|---|---|
| Lv10+ | 16 | 15 | 2 | 1 | 5 | 5 |
| Lv100+ | 10 | 10 | 3 | 1 |
Living things
Humans are the civilised inhabitants of the world. In addition to human-like Pawns, other semi-sentient lifeforms above the level of the beasts include Saurians and Goblins, both of which live in groups. Giant semi-humanoid creatures included the simple-minded, single-eyed Cyclops and excitable Ogres. (Early conceptions of the world suggest that Elves may exist, but none are known in Gransys.)
Beasts and birds include relatively peaceful Deer, Rabbits, Oxen, and Boar, Gulls and Crows, as well as mice and spiders which may grow to giant size in suitable environments and become dangerous. Dangerous flying creatures include harpies and gargoyles. In addition to the ogres and cyclops there are several species of generally highly-dangerous giant beasts, such as Griffin, Cockatrices and Chimera.
Beyond the world of the living, the dead can become animated as if alive: numerous types of undead folk, skeletons and liches are all known, as well as various incorporeal phantoms; all are dangerous creatures.
Overview
The Ancient Quarry is located west of Gran Soren, connecting Southern and Central Gransys. The eastern entrance is from the Estan Plains (near the abandoned Miner’s Hut), and the western exit is approximately halfway between The Shadow Fort and the Rest Camp in the Devilfire Grove region.
The quarry consists of a main tunnel running from exit to exit via a central area where quarrying has taken place, and there are a number of side and minor tunnels. An Abandoned Mine is located off the main route through the quarry, consisting of a forge and human made tunnels.
On first stepping into this area, it will be filled with Bandits and monsters, and the grills of its main gates will be lowered; the merchant Alon will be loitering directly outside the eastern entrance to this area. Eliminating the monsters, and opening the gates for Alon are part of the quest Of Merchants and Monsters.
Once the quarry has been cleared and the quest finished, The Ancient Quarry will become a safe zone, allowing the Arisen to run through without fear of monsters or loss of stamina. Alon will then move to the Abandoned Mine, and set up a shop (Alon’s Shop) that supplies some useful warrior and fighter equipment.
The quarry serves as a useful shortcut from Gran Soren to The Shadow Fort, more so once free of monsters. Further, it can be used to access the northern section of Gransys before completion of Off With Its Head.
Seven days after acquiring the Promissory Notes, two miners near the entrance will have excavated two additional mine tunnels containing four new treasure chests.
Overview
- «This nimble warrior can both mount and attack foes, and use a bow to strike from afar.»
Striders are a high dexterity vocation focused on swift and powerful melee strikes, along with close range arrow attacks. Their primary Weapons are a pair of Daggers, supported by a Shortbow. For armor Striders generally wear Light Armor Sets, or similar non-set components — their armor requires a trade off between defense and mobility — custom arm armor leaves one hand unrestricted for easy use of the bow.
Striders are uniquely fast climbers and are very well suited to attacking giant creatures directly. When climbing their stamina use is one third less of all other vocations, and they gain a damage boost when climbing certain giant foes. They can also hold their own on the front lines, relying on fast movement and dodges to evade enemy attacks. Their shortbows are best suited to arrow strikes at short distances, and lose power rapidly at distance.
Striders have balanced growth as they gain experience, with stamina development being notably high — suited for their energy sapping quick attacks. They lack magick and all their attacks are based around physical strength.
Additionally they have a variety of skills to trap, stun, and trick foes, and are the only vocation than can steal from other creatures.
Pawn Chatter
On entering from the Deos Hills entrance
- «The crypt was fashioned ages ago, before the Faith came to Gransys.»
- «… Long ago, when the people worshipped the old gods, the gods of nature.»
- «… I suspect it’s why they returned their dead to the soil. To the Earthgod.»
- «Few come to offer prayers for those who rest here in the catacombs. That their souls might be cleansed and born anew in the coming generations.»
- «If ever it was the seat of a god, that time has surely past.»
On the inhabitants
- «Be careful — the walking dead are all around us.»
- «Undead sleep beneath the earth!»
- «To judge from the beasts that dwell here, the place holds a dark power.»
On the sarcophagi
- «I believe some of the coffins are booby trapped.»
- «If you see gas leaking, ’tis likely a gas trap.»
On the lamps
- «The lamplight will make spotting traps easier.»
By the hidden room
- «Would that we had some manner of foothold…»
- «I’d wager we could scale that wall.»
In the natural tunnels
- «If monsters appear, let’s take advantage of the uneven tarrain.»
- «The Pawn legion make no graves. No need.»
- «What dark, forgotten age saw this place built…?»
Pawn Travel Knowledge
Areas that should be visited for Pawn travel knowledge are:
- Both east and west entrances.
- Leaper’s Ledge — both the slide entry points and stone stair exits.
- The natural stone bridge with Cyclops.
- Visiting the area of the eastern side of the broken bridge on the First Floor grants Pawn Travels Knowledge. (Revisiting this area several times may result in additional Knowledge.) The western side may also need to be visited.
- The climbable areas above the rock platforms where the Sulfur Saurians lurk may also yield Pawn Travels Knowledge.
- Slide down both the sides of the watery slide after the stone bridge.
Description
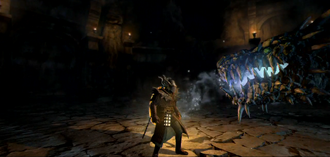
Face to face with a Wyrm
- «The wyrm is a subject of deepest interest… It is possessed of strength and intellect in equal share, and a crystalline instinct to rival all other beasts, no doubt. A perfect mage, truly. The power it must hold is beyond reckoning.» — Steffen
The Wyrm is one of three species of lesser Dragons, along with the Drake and Wyvern. Wyrms share many characteristics in common with their cousin species, however the Wyrm rarely flies but is a powerful spellcaster, able to repeatedly and rapidly incant strong spells such as Bolide. Whilst the Drake has an affinity to fire and the Wyvern to lightning, the Wyrm is strong in the ice element. This makes them vulnerable to fire based spells and weapons.
Defeating a Wyrm has a chance of dragon forging the Arisen’s equipment as long as that equipment has at least one level of enhancement.
On Bitterblack Isle are more dangerous Wyrms known as Frostwyrms.
Notes
- The people of Gransys also use the word ‘Wyrm’ to refer to dragons more generally, or specifically The Dragon.
- The Wyrm found at the Watergod’s Altar speaks in english, not Wyrmspeak.
- The horns can still be broken off when the Wyrm is dead, but there is a short time window to do so.
- The Wyrm’s Tear increases the drop rate percentage of rare loot. It also increases the drop rate of Wakestones and Wakestone Shards in The Everfall. When in the party’s inventory together with the Drake’s Tear and Wyvern’s Tear, the drop rate percentages increase further.
- The Wyrm possesses smaller wings than either the Drake or the Wyvern.
- The Wyrm at The Watergod’s Altar (Post-Game) takes a long time to respawn, over 20 days. Other Wyrms such as found in The Everfall may take less.
Inhabitants
Before completing Of Merchants and Monsters, the quarry contains half a dozen Bandits near the Abandoned Mine, whilst the galleries of the mine contain several Undead and Undead Warriors as well as Giant Bats. Side passages near the western exit contain several Goblins. The most dangerous creatures in the mine are three Ogres who have made their homes in the passages.
Other minor creatures include Snakes, Rats, and Spiders. If Of Merchants and Monsters is not completed, the Ogres do not return, even after many moons, but the lesser creatures will return.
During the quest The Wyrmking’s Ring, Salomet and his Bandit allies may also be encountered in the mine.
People
After completing Of Merchants and Monsters, the mine becomes populated with people: all have escort quests that will be posted on the notice board at the Union Inn in Gran Soren. The guards want to go to Bloodwater Beach, and they offer some decent rewards. The miners want to visit the Shadow Fort but they offer only mediocre rewards.
- Alon — specializes in some heavy armor, as well as other melee weapons, and some preserved items.
- Nilson and Robyn — miners
- Ser Samwell and Ser Constans — guards
Dark Arisen
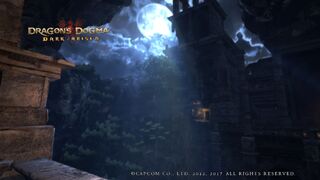
Duskmoon Tower and Bitterblack’s moon
The tale told in Dark Arisen is a sad one, full of grief, and is best learnt through reading the texts inscribed at the Monument of Remembrance, which tell the tale of Grette, Ashe, and Olra.
The place itself, Bitterblack Isle, is a magickal and cursed place, created as the wish fulfillment of one who was tricked by a Dragon into sacrificing his loved one — it appears to exist outside of Gransys, and yet not in any other land — most likely it is a place that only exists beyond the rift, as it is only accessible to Arisen.
The tale told in the questing in Dark Arisen confirms many things surmised or assumed about the world order in Dragon’s Dogma — specifically — that Great Dragons are created from Arisen that failed in their quest at the final stage, and were defeated by the Seneschal. The story of Olra also seems to be another example of the Bestowal of Spirit, though not one in which the Arisen was successful.
The land of Bitterblack is twisted through the grief and anger of its wisher, who became its lord, and monster, Daimon. Parts of the island, such as The Fallen City appear to be re-imaginings of the world that Ashe and Grette once inhabited.
Time might pass differently on Bitterblack than in Gransys; there is no sun, though there is a visible moon.
The quests, By Royal Decree I, II, & III introduce the name «King Theodore the Bold», though nothing else is known. The quests In Aid of the Emerald King I, II, III, & IV tell the story of a court chamberlaine, unnamed, who took up the mantle of Arisen in order to acquire ingredients for a curative potion for his King, who had been poisoned by members of his senate. The king, described as the Emerald King, is named «King Arsemus II». No more is known of either king, even whether they existed or no, or are just figments of the Isle of Bitterblack.
The beasts of the Isle are twisted or more powerful versions of those found in the world — one stands out as unique, a creature known only as Death, thought to be the spirit of a former arisen, called Arthacos, who became possessed within the Isle, and lost his mind — his tale is also told on the Monument of Remembrance, and through the quests The Wages of Death I, II, III, and IV.
One further Arisen is introduced, Barroch, a former apothecary turned alchemist, he has no pawn, and has abandoned the hunt for the Dragon and is bound by some inexplicable force to remain on the isle. As part of his researches he obtained the skill of improving equipment beyond Dragonforged, through a process known as rarifying.
Интересные факты[править]
При этом мировоззрение и сюжетная основа явно демонстрируют влияние восточных философий и религий с отсылками на реинкарнацию, перерождение и бесконечные циклы. Уровень технологии Грансиса — это уровень классического «высокого средневекового фэнтези», так как никакого огнестрельного оружия не наблюдается, но существуют простые пороховые устройства, такие как и баллисты. Присутствуют также стандартные элементы фэнтези, вроде магии, алхимии, амулетов, зелий, магических книг и свитков и т. д. Элементарная магия отсылает как к восточной, так и западной философии. История Воскресшего, с её акцентом на воле как ключе к существованию, перекликается с интерпретациями некоторых концепций, введенных немецкими философами, включая «Волю к власти» Фридриха Ницше и «Волю к жизни» Артура Шопенгауэра.
Если затрагивать тему более современных источников вдохновения создателей игры, то можно отметить мангу Berserk. В игре даже присутствуют доспехи и оружие Гатса и Гриффита — в рамках официального сотрудничества. Также, как уже было отмечено, Селена имеет определённое сходство с Ширке.
Walkthrough
This quest becomes available after meeting the Duke in the quest Come to Court.
From Fedel to the Cursewood
Speak to Fedel within the Duke’s Demesne in Gran Soren to obtain this quest. Fedel seeks a meeting after nightfall to explain the sensitivity concerning the loss of the letter.
The destroyed cart
Sleep at the inn until night and head to the Duke’s Demesne in the Noble Quarter.
Avoid the night guards and wait for Fedel by the gazebo in the eastern garden area. Fedel takes time(upto 5 minutes) to come out, so be patient. There, Fedel will explain his quest and direct the Arisen to a location in the Cursewood where the lost confidential report was stolen by flying monsters.
At the crossroads in the Cursewood, the Arisen will find the remains of Fedel’s cart and a Gargoyle will be seen flying away to the northwest towards Soulflayer Canyon.
Into Soulflayer Canyon
Now travel to Soulflayer Canyon to retrieve the letter. Reaching the correct ledge in the canyon can be a little tricky, but a pawn with full knowledge of this quest and Soulflayer Canyon will lead the Arisen directly to it.
From the west entrance, take a left at the passage fork. After slaying the Cyclops on the bridge, continue straight until reaching a treasure chest on the left side and a steep downward grade on the right side. Slide down the left side of this grade to the landing with two Godsthrone Blossoms (sliding down the right side leads to the main entrance). Slide down two more times toward the left to another area that may contain a snake and two spiders.
Collect some gold pouches, a Panacea and two Sconces on the left before encountering yet another downward slide. Slide down the right side of this downward grade to a landing with more gold pouches, the fleeing Gargoyle, quest items scattered on the ground, and a chest containing a Steel Beak.
Slay the Gargoyle and collect the Confidential Letter as well as the Parcels lying scattered on the ground and return to Gran Soren.

The Conspirators (quest walkthrough through the east entrance of Soulflayer Canyon)
Walkthrough entering Soulflayer Canyon from the east (Cursewood)

The Conspirators (quest walkthrough)
Walkthrough entering Soulflayer Canyon from the west (Barta Crags)
If entering from the east, just traverse the tunnels of the canyon until the fork after the west entrance is reached, and continue as above.
Return to Gran Soren
Back in the capital, one may want to make forgeries of the Confidential Letter at the Black Cat afore handing it in.
Upon entering the Duke’s Demesne, the Arisen will be accosted by Ser Gabrian who was lurking behind a corner to the right of the entrance. This is the only opportunity to speak to Ser Gabrian. Either give him a copy or refuse. If refused, the letter must then be taken to Fedel.
The quest ends when the Arisen brings back the Confidential Letter to Fedel, or Ser Gabrian.
Rewards and outcomes
By forging the letter, the Arisen can obtain the gold and experience reward for the quest twice: first when giving one to Ser Gabrian near the entrance, and the second to Fedel. To collect both rewards, Ser Gabrian must be given his copy first, then Fedel the second one.
The storyline will not be altered either way the Arisen handles this quest, though Fedel is correct about signs of a rebellion. It seems the letter refers to the soldiers who later rebel at Windbluff Tower. Ser Gabrian is almost certainly trying to intercept the letter and thus is in league with the treachery at Windbluff Tower.
The sedition reaches its peak during the revolt in the later quest Pride Before a Fall.
- Obtaining both rewards
Once Ser Gabrian is given the letter (or a forged copy of it), the quest will be marked as «Completed». However, the Arisen can still deliver a copy of the letter to Fedel upstairs in the castle.
- If the current active quest does not involve Fedel, he will have a blue question mark indicator over his head. He may speak as though the quest failed, but it will still be possible for the Arisen to give him the letter.
- If the player plans to give Ser Gabrian a Confidential Letter Forgery, carry an original Confidential Letter in the Arisen’s active inventory or the cutscene will not trigger.
Min-Maxing
Some people seek to maximise specific aspects of the development of their characters — usually this involves leveling as specific vocations to obtain the greatest possible attack stats, health, or occasionally stamina, often at a cost of defense. (aka Min-Maxing)
There is no absolute need to min-max: a fully leveled character of any development, equipped with good weapons and tactics, can defeat even the strongest foes with relative ease, even when adventuring alone.
For melee vocations the offensive magick stat has little or no effect on weapon damage even when using enchanted weapons, so for a pure melee build, any points in magick can be considered wasted. Leveling while avoiding placing points in this stat can be worthwhile. Similarly, for magick vocations, the strength stat may have no useful effect on spell damage; for example, for Mystic Knight’s Great Cannon spell, only weapon strength (and not core Strength) matters, although both core and weapon magick contribute to the power of this spell. Only the hybrid vocations Magick Archer and Mystic Knight make use of both offensive Magick and Strength stats.
- Levels 10-100
- Most vocations distribute 11 stat points between the four offense and defense stats. The exceptions are Sorcerer and Magick Archer.
- Generally total Health and Stamina growth is 50 in total, give or take a few points. However Mage only gains a total of 31 points, but does not gain stats elsewhere; objectively this vocation is inferior when maximising stat development from lvl.10-100.
- Sorcerer gains 13 points per level, mostly in magick, at a cost of lower health and stamina growth.
- Magick Archer gains only 41 points split between health and stamina, but distributes 12 points between the four attack and defense stats; however, its offensive growth is poor, and is not usually a preferred choice for min-maxing.
- Levels 100-200
- For Rangers (only) maxing Stamina has the side effect of increasing potential damage from Great Gamble.
- The maximum number of stat points spread across Defense, Magick Defense, Magick, and Strength is 1958 — such a build results in a combined total of Health and Stamina of 6118.
Specific builds
Common min-maxed build include:
- 10-200 as Sorcerer, for maximum spell power (Magick), also very useful for an end game Magick Archer.
- 10-200 as Assassin (Arisen), or Warrior (Pawn), for a character with maximum physical Strength.
- 10-200 as Ranger for maximum Stamina, and near maximum physical strength.
- 1-100 as Fighter gives maximum physical Defense
- There are many routes to balanced builds, but Strider, and Mystic Knight have balanced growth throughout all levels. Strider favors stamina, whereas Mystic Knight favors health.
Sources
- Dragon’s Dogma characters (Capcom) Biographies
-
Dragon’s Dogma Digital Comic (Capcom, YouTube channel, R18)
- Chapter 1 «City of Viete»
- Chapter 2 «Barta Crags»
- Chapter 3 «Estan Plains»
- Chapter 4 «The Cursed Mountain»
- Behind the Scenes of Dragon’s Dogma: A Look at the Development of Capcom’s Open-World Action Role-Playing Game (28 March 2013) Game Developers Conference, Hideaki Itsuni.
- GDC 2013: Hideaki Itsuno — «Behind the Scenes of Dragon’s Dogma: A Look at the Development of Capcom’s Open-World Action Role-Playing Game» archive.org
- Behind the Scenes of Dragon’s Dogma: A Look at the Development of Capcom’s Open-World Action Role-Playing Game www.gdcvault.com
- Behind The Scenes Of Dragon’s Dogma www.youtube.com
- Articles :
- [GDC 2013]“BBSのような手軽さ”の追求がポーンを生んだ。企画書から探る「Dragon’s Dogma」の原型 (27 Mar 2013), in Japanese, www.4gamer.net
- 新しいシステムを理解してもらう難しさ (3 April 2013), in Japanese, www.famitsu.com
- GDC 13: カプコン伊津野氏が明かした『Dragon’s Dogma』の企画が通るまで (29 Mar 2013), in Japanese, www.gamespark.jp
- 【GDC 2013】「ドラゴンズドグマ」伊津野英昭氏講演レポート (30 Mar 2013), in Japanese, game.watch.impress.co.jp
- Dragon’s Dogma: Official Design Works (ISBN 1926778928) (2012)