Wight
Содержание:
- DLC Quests
- Pawn Bestiary Knowledge
- Pawn Bestiary Knowledge
- Tactics
- Description
- Overview
- Dragon’s Dogma
- Dark Arisen
- Квесты, доступные после завершения сюжетного задания «A Rude Awakening» (битва с гидрой)
- Как телепортироваться? Как быстро перемещаться в игре?
- Notes
- Min-Maxing
- Overview
- Notes
- Notes
- Trivia
- Как выйти из тюрьмы? Как сбежать из тюрьмы?
- Included content
- Attacks
- Overview
- Overview
DLC Quests
- From a Different Sky — Part 1
- From a Different Sky — Part 2
- From a Different Sky — Part 3
- From a Different Sky — Part 4
- From a Different Sky — Part 5
- From a Different Sky — Part 6
- From a Different Sky — Part 7
- From a Different Sky — Part 8
- From a Different Sky — Part 9
- From a Different Sky — Part 10
Quest Pack: The Chosen
- Reclaim the Roads
- Evil Underfoot
- Set Against the Dead
- Eye for an Eye
- A Taste to be Acquired
- Ocean’s Bounty
- Harpy Hunting
- Bury the Dead
Quest Pack: The Savvy
- The Abomination
- The Centennial Bloom
- Following Orders
- Journey to the Rotting Wood
- Come Home to Roost
- Keepers of the Ancient Flame
- A Dire Need
- Grave Danger
Pawn Bestiary Knowledge
For full information, refer to the Bestiary page or the according section on the Drake page.
Enemy Specific:
- Weak to Holy
- Weak to Fire
- Let the poison breath attack hit you making time-sensitive items rot instantly. This may have to happen several times. Pawn’s comment, «Augh…our meat and vegetables rot» or «His putrid breath spoils our belongings» is not an indication that they learned this already.
- Let the Dark Bishop revive his pet Cursed Dragon after it dies. May need to be witnessed a few times.
- Let the Dark Bishop possess its pet Cursed Dragon. May also need to be witnessed a few times.
- Avoid head-on rushes.
- Perfect Block a lunge/bite attack.
- Witness the Cursed Dragon in The Fallen City cast spells.
In addition to witnessing these techniques, it is necessary for pawns to participate in killing over 15 Cursed Dragons with their own Arisen or while traveling with others.
It is thought that the Cursed Dragon accompanying the Dark Bishop and the Cursed Dragon in the Fallen City each generate unique knowledge flags that the standard Cursed Dragon spawning as a necrophagous beast does not.
Pawn Bestiary Knowledge
- Weak to Holy
- Witness a possession and free the possessed
Enemy specific:
The scroll Ghost Tactics Vol. 2 grants Phantom specific knowledge.
In addition to witnessing these techniques, it is necessary for Pawns to participate in killing 50 Phantoms either with their own Arisen or while travelling with others.
More information can be found on the Bestiary page.
Pawn Chatter
- «Swords are useless!»
- «An ally’s blow will dislodge the ghost!»
- «A forsaken soul floats in the air!»
- «It grows with the life it steals!»
- «Phantoms release their hosts when attacked!»
- «Call for help if a phantom takes hold.»
- «It grew!?»
- «We cannot let it wail! I’ll respond with magickal light»
Tactics
- Vulnerable to magick attacks.
- Weak against Holy magick, and holy weapon enchantments.
- Vulnerable to physical attacks when they possess allies.
- Ghosts take around double damage when attacked afore they become aware of the party :
- The Magick Bow spells Seeker and Seeker Bolt amongst others are particularly effective in getting a pre-emptive strike.
- The range of Magick Bolts from a staff is also enough, but often ghosts will become aware first.
- Holy Focused Bolt will reliable strike ghosts at a distance.
- Pawns whose health is reduced to zero by the possession attacks are returned to the Rift immediately and cannot be revived.
- The Legion’s Might staff can’t revive pawns slain by ghosts in this manner.
- Whilst under the influence of ghosts, Pawns will not use healing curatives.
- A Phantom’s hold on a pawn can also be ended by grabbing and carrying the pawn.
- When adventuring solo, a ghost’s possession attack may sometimes be broken physically by throwing an item, or by throwing an explosive against a nearby wall.
- Simply running away from a ghost’s haunt can cause it to dislodge.
- Resistant to Great Sacrifice if directly hit.
Description
- «The leader of the Westron Labrys band of lady bandits in the western part of the peninsula. She loves to fight, and hates men.»
Ophis is the leader of the bandits called the Westron Labrys Bandits located in Gransys’ north-western part. Hers is the rival gang of Maul and his Iron Hammer Bandits.
She despises men and will not hesitate to attack the party on sight if any of them are male. Ophis will press the attack even after all male party members are incapacitated. Confrontation can be avoided by disguising male allies as women.
Ophis likes the color red, like all other female bandits; she wears Lady’s Corset, Striker’s Greaves, Assailant’s Bracers, Sultry Pareo, Dragon Band, and Alchemickal Cloak, and carries a Magian Crutch spellbow and Vouge Daggers.
If slain she’ll drop a Giant Coin Pouch (10,000 Gold).
Ophis has similar resistances and weaknesses to melee attacks and magick elements as Maul — similar to that of a common higher level assassin bandit, but with higher health. She fights as a Magick Archer.
|
|||||||||||||||
|
|||||||||||||||
| Sources: Dragon’s Dogma — ドラゴンズドグマ & Dark Arisen (www10.atwiki.jp), the ‘Dragon’s Dogma Signature Series Guide’ and in-game testing. |
Overview
| Type |
|
|---|---|
| Experiencegained | Base Experience of 25,000
Can be more or less depending on a few factors such as:
|
| Location |
Devilfire Grove’s Drake Estan Plains’ Drake Conqueror’s Sanctuary’s Drake Gransys Devilfire Grove
|
|
|
On death Dragon Scale (20%), Amber Dragon Scale (32%), Dragon Claw (12%), Indurated Dragonsblood (5%), Rift Cluster (5%), Drake’s Tear (5%), Dragon Horn (1%), Greatwyrm Stone (1%) Drake Horns destroyed Dragon Horn (100%) Drake Wing destroyed Great Dragon Alula (80%), Dragon Scale (14%), Amber Dragon Scale (5%), Drake’s Tear (1%) |
Stats
|
|||||||||||||||||||||||||||||||||||||
|
|||||||||||||||||||||||||||||||||||||
|
|||||||||||||||||||||||||||||||||||||
| Sources: Dragon’s Dogma — ドラゴンズドグマ & Dark Arisen (www10.atwiki.jp), the Dragon’s Dogma Signature Series Guide, List of Creature Debilitation Resistances, and in-game testing. |
- † The Conqueror’s Sanctuary Drake has higher defense (around 510), and considerably higher attack and aggression
Damage is modified relative to the Drake’s stats depending on where it is struck.
- Blows to the heart receive a 0.75x damage multiplier.
- The head receives a 0.3x multiplier.
- The wings receive a 0.3x multiplier.
- Other areas such as the tail, legs and body are even more armored and take very little damage, often 7.5% (0.075x) of calculated damage or even half that
- Both magick and physical damage are affected
- A reeling drake takes double normal damage
- When possessing a pawn damage is increased by 33.3%
Damage is also increased for physical bow users, and melee attacks when climbing
- Melee attacks from climbers get an additionally 1.5x damage boost (strider gets a further boost)
- Longbow and shortbow damage is doubled (when hitting the heart or head)
Attacks
| Attack | Type | Description |
|---|---|---|
| Fire Breath | Mag | A massive stream of fire is blasted from its mouth. Can cause Burning. The Drake can use this move either when pacing forward or backing away from its target(s). |
| Charge | Phys | Charges at a target on the ground to trample it. |
| Grab (Arisen) | Phys | The Arisen is grabbed and then slammed into the ground. |
| Grab (Pawn) | Spec/Status | A Pawn is grabbed but instead of being slammed into the ground, the Drake tries to seize control over the pawn. Causes Possession, which turns the Pawn against the Arisen. |
| Slam | Phys | Will take flight then drop suddenly to slam its torso into the ground, inflicting massive damage to anyone underneath. |
| Aerial Spin | Phys | If the Arisen or one of his/her Pawns are holding onto the Drake while it is in flight, it will spin rapidly, draining a massive chunk of stamina. |
| Stomp Attack | Phys | A powerful attack with its feet, staggers targets. |
| Sweeping Backhand | Phys | A backhanded slap with one of its front claws. |
| Tail Sweep | Phys | A powerful spinning attack with its tail, knocks targets off their feet. |
| Wing Flap | Phys | Powerful wing flaps that create strong winds preventing the party from approaching. |
| Dragon Roar | Spec/Status | A mighty roar that kills all Pawns within range, staggers the Arisen and can cause Skill Stifling, as well as rendering pawns unconscious. Dragons will immediately Roar in retaliation when one of its horns are destroyed, or when its wings are disabled.
A drake also roars when its heart is first exposed, but this does not skill stifling or render pawns unconscious |
| Fiery Drive By | Mag | After spending enough time in the air, while the party is using cover, flies up into the sky and then dives past a target, breathing fire, eventually clash landing at the target’s position similar to Griffin. The Dragon may perform multiple passes before landing again. |
- When a Dragon Horn is destroyed, Pawns will declare «The horn is destroyed!» and a piece of Dragon Horn will drop. There is a horn on either side of the head.
- Destroying the wings causes Pawns to declare «‘Tis grounded, Master!» or «On solid ground, the advantage is ours!» , and a Great Dragon Alula will drop.
- Intact horns can be destroyed after the Dragon is slain, likewise, an alula may by obtained by striking a dead Dragon’s back where the wings intersect.
Dragon’s Dogma
Once an area is cleared of creatures, it will stay empty for a period of time — smaller foes can reappear several times in a Day and Night cycle, others reappear after a day or so. The largest foes such as Drakes or Evil Eyes take a week to reappear.
Of all the creatures, the Griffin is the most erratic, appearing regularly at two sites, and oft refusing to land; for more details see Griffin.
Quest related encounters do not re-occur; of all the monsters in Gransys, only The Dragon cannot be farmed, appearing only once per questline.
Ur-Dragon
- For more details on defeating this foe, see Ur-Dragon and Ur-Dragon Class Strategies.
The offline Ur-Dragon is much easier to kill than the online version and can be relatively easily farmed for its loot drops. (Lvl.50+, Lvl.80+ recommended.)
Destroying the Dragon’s hearts yields useful rewards, including large amounts of Putrid Dragon Scales which sell for over 20,000 Gold, as well as other Dragon parts, and fairly common drops of Ambrosial Meats. Each heart gives two or three items, with 30 hearts on the Ur-Dragon.
Once killed, the Dragon always rewards the Arisen with 20 Wakestones, and a special holy enchanted weapon — both of which sets can be sold for over a million gold.
Evil Eye
In Dragon’s Dogma, the Evil Eye tentacles could be farmed for Malecryst Shards when encountered during the early quest Lure of the Abyss. In Dark Arisen, these tentacles no longer drop any items. The tentacles found in the outer halls of the Chamber of Sorrow do not drop Malecrysts, only those found in direct association with the Eye itself.
During a conventional Evil Eye battle, the tentacles can be farmed in a similar fashion for rewards, whilst doing little damage to the Eye itself. Active Pawns may interfere with such a scheme by killing the Eye of their own volition.
Dark Arisen
The reappearance of creatures is far more rapid on Bitterblack Isle than in Gransys. There are two more ways to encounter additional foes — via reentering the arena like areas Rotunda of Dread and The Black Abbey after a set of enemies has been killed; and also creatures that are attracted to the corpses of others — these are known as Necrophages.
- For a list of the creatures found in the arena, see Rotunda of Dread and The Black Abbey.
Death, Garm, Elder Ogre, and Cursed Dragon
- For a list of the types of Necrophages that can be lured in specific locations, see Necrophage.

How to Stun-lock Death in the Garden of Ignominy (Post-Daimon)
A level 51 Assassin (but with 51 levels of Strider) locks Death in a knockdown animation in Hard Mode.
Placing Rancid Bait Meat in certain areas attracts Necrophages — that is — either Death, Garm, Cursed Dragon, or an Elder Ogre.
In addition to the source of materials and experience, killing Cursed Dragons is an effective way to dragonforge equipment, with only the Ur-Dragon being more effective. Using bait meat in Duskmoon Tower (Pre-Daimon) will lure only a Cursed Dragon, making this a convenient location for dragonforging.
Notes
- Exiting and re-entering an area with Rancid Bait Meat may cause a second necrophage to appear once the first has been destroyed.
- Generally a third monster will not appear.
- In the Post-Daimon Duskmoon Tower Cursed Dragons may appear even without bait. Pre-Daimon, Bait is required to lure a Cursed Dragon, killing the local fauna will not suffice to lure one.
- Using Bait in Duskmoon Tower can cause up to three Cursed Dragons to appear.
- After the bait has been used, and the monsters fought further baits in the same area will not work for a long time (~1 week) Exiting Bitterblack Isle, returning to Gransys, and sleeping for ~3–4 days before returning should allow further baits to work.
- Leaving the area, saving and re-loading from the main menu will resume the bait mechanics.
- When different necrophages can be baited in a designated area, the appearance depends on the present enemy set — this can be changed by exiting the labyrinth and re-entering it from Bitterblack Isle Harbor.
Daimon
Daimon can be battled continuously after he has been killed for the first time, re-appearing whenever the Arisen enters the Bitterblack Sanctum. The four treasure chests within the Bitterblack Sanctum will also always be refilled after the battle.
Death
Death, like Daimon, can be battled continuously in The Bloodless Stockade pre-daimon. He appears every time the Arisen enters. Certain vocations can exploit certain mechanics to slay death every encounter.
One way of doing this is by causing death to fall into the abyss: Lure Death to the fall of the water opposite the entrance to the Sparyard of Scant Mercy — the aim is to get it to teleport so that it is over the abyss (stand at the edge and face away from fall may help). This method is further detailed in the video below. Additional methods are also detailed.
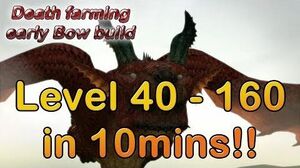
Dragon Dogma Dark Arisen best XP farming spot 20,000,000 xp in 10 minutes
Detailing Death farming by Optinoob
It is advised to not bring pawns as they may interfere with deaths «aggro».
- For all vocations able to use Blast Arrows it is possible to knock death into the abyss every encounter. Doing so forfeits all potential rewards barring Experience Points
If the item drops are desired then simply slay death outright each encounter. With blast arrows it is possible to knock death down over and over again.
. The video on the right provides a detailed guide.
- For Magick Archers Ricochet Hunter
Alternatively it is possible to knock him into the abyss through the use of Magickal Radiance.
can be used to slay death in a single encounter and obtain his item drops.
- Other vocations may have to fight death over multiple encounters. By exploiting his spawn patterns in the Bloodless Stockade you can kill him sooner than you otherwise would be able to.
- Exit and re-enter to re-lure death for additional experience and/or item drops.
- It is also possible to slay the creature using the abyss in the Arisens’ second encounter with it in the Fortress of Remembrance.
«Farming» Death is the fastest way of leveling up available.
Квесты, доступные после завершения сюжетного задания «A Rude Awakening» (битва с гидрой)
Cassardis
An Uninvited Guest (Pablos, гостиница)Говорим с отмеченными продавцами, докладываемся квестодателю, а затем просто ловим воришку. Его можно замедлить, ударив, или подождать у ворот, куда он так или иначе прибежит.
Deep Trouble (Poll, у колодца рядом с воротами)Спускаемся и убиваем всех сауриан.
Guard Duty (Madeleine, гостиница)Сопровождаем Маделейн в Encampment, после чего удовлетворяем просьбу девушки и даем 1000G на нужды.
Lost & Found (Ghief Adaro, у колодца или у себя дома)Идем в Witchwood, где и находим девушку, после чего сопровождаем ее к домику ведьмы. Туман в лесу можно развеять, уничтожив талисманы.Квест нужно выполнить до завершения сюжетного задания Lure of the Abyss.
Как телепортироваться? Как быстро перемещаться в игре?
Быстрое путешествие в осуществляется за счёт телепортации. В разных местах вы можете встретить низкие кристаллы, торчащие из земли. Они называются Portcrystal
(портальный кристалл) и используются несколько иначе, чем вы могли подумать. Покинуть локацию с помощью такого кристалла нельзя, однако сюда можно переместиться, если использовать специальный камень под названием Ferrystone (камень перемещения). Откройте вкладку «Инструменты» (Tools) в инвентаре, чтобы найти те самые камни перемещения. Используйте один из них, чтобы оказаться в одной из точек с портальными кристаллами. После использования такого кристалла он исчезнет. Для каждого быстрого перемещения вам придётся расходовать один кристалл.
Notes
Not only are Portcrystals the only placeable items in Dragon’s Dogma, they can also be used with Leaping Stone to jump to higher places, such as at tower within The Abbey
- Placed Portcrystals can be picked up again and placed elsewhere an unlimited number of times.
- Cannot be placed inside areas like cities, caves, dungeons, etc.
- Cannot be placed anywhere within Bitterblack Isle.
- Can only be placed in the outside (outdoor) world of Gransys.
- Only 10 portable Portcrystals can be placed around the world at any one time.
- Portcrystals can be forged, but a Portcrystal Forgery does not have the transversal properties of a real Portcrystal (i.e. it doesn’t work).
- Deployed Portcrystals placed by the Arisen will remain where they are when New Game Plus is started.
- Portcrystals picked up from the first play-through will respawn in New Game Plus, allowing the Arisen to collect them again.
- Portcrystals can be gifted to other players.
Min-Maxing
Some people seek to maximise specific aspects of the development of their characters — usually this involves leveling as specific vocations to obtain the greatest possible attack stats, health, or occasionally stamina, often at a cost of defense. (aka Min-Maxing)
There is no absolute need to min-max: a fully leveled character of any development, equipped with good weapons and tactics, can defeat even the strongest foes with relative ease, even when adventuring alone.
For melee vocations the offensive magick stat has little or no effect on weapon damage even when using enchanted weapons, so for a pure melee build, any points in magick can be considered wasted. Leveling while avoiding placing points in this stat can be worthwhile. Similarly, for magick vocations, the strength stat may have no useful effect on spell damage; for example, for Mystic Knight’s Great Cannon spell, only weapon strength (and not core Strength) matters, although both core and weapon magick contribute to the power of this spell. Only the hybrid vocations Magick Archer and Mystic Knight make use of both offensive Magick and Strength stats.
- Levels 10-100
- Most vocations distribute 11 stat points between the four offense and defense stats. The exceptions are Sorcerer and Magick Archer.
- Generally total Health and Stamina growth is 50 in total, give or take a few points. However Mage only gains a total of 31 points, but does not gain stats elsewhere; objectively this vocation is inferior when maximising stat development from lvl.10-100.
- Sorcerer gains 13 points per level, mostly in magick, at a cost of lower health and stamina growth.
- Magick Archer gains only 41 points split between health and stamina, but distributes 12 points between the four attack and defense stats; however, its offensive growth is poor, and is not usually a preferred choice for min-maxing.
- Levels 100-200
- For Rangers (only) maxing Stamina has the side effect of increasing potential damage from Great Gamble.
- The maximum number of stat points spread across Defense, Magick Defense, Magick, and Strength is 1958 — such a build results in a combined total of Health and Stamina of 6118.
Specific builds
Common min-maxed build include:
- 10-200 as Sorcerer, for maximum spell power (Magick), also very useful for an end game Magick Archer.
- 10-200 as Assassin (Arisen), or Warrior (Pawn), for a character with maximum physical Strength.
- 10-200 as Ranger for maximum Stamina, and near maximum physical strength.
- 1-100 as Fighter gives maximum physical Defense
- There are many routes to balanced builds, but Strider, and Mystic Knight have balanced growth throughout all levels. Strider favors stamina, whereas Mystic Knight favors health.
Overview
Three of the archmagicks (or elements) have secondary effects or debilitations associated with them. These are: Fire — burning; Ice — frozen; Lightning — thundershock. The Holy element is associated with healing, as well as damaging all undead or re-animated creatures, whilst Dark attacks can inflict Critical Hits; Dark magick is generally associated with the infliction of debilitations.
Most spells except the core spells (such as Magick Bolt), and a few others (eg Ruinous Sigil) have a specific element associated with them, e.g., Fulmination is Lightning, Maelstrom is Dark, Gicel is Ice, Bolide is Fire, Seism is Holy.
Generally element only affects Magickal attacks.
Damage and Use in Battle
- See also: Damage Calculation
Clever use of elemental effects can radically alter the course of a battle. An ill-equipped party without a wide elemental range can find itself in deep trouble, while the same fight’s difficulty can be dramatically reduced if the correct element is utilized. Conversely, poor choice of enchantments caused by lack of knowledge can make even an easy battle difficult, and in some cases aid the enemy.
Elemental damage is a percentage modifier on magickal attack power. For example, if using Magick Bolt — if a target’s relative elemental weakness to fire is 100% then a magickal attack power with that element does the same damage as an unenchanted magick bolt; but if the weakness is high, as with Undead, where it is 400%, then the attack power is quadrupled; similarly if the weakness is low, such as with Hobgoblins and dark magick (at 60%) then the spell power is reduced to three quarters of what it would be from a non-elemental magick attack.
The increases and decreases in spell power roughly correspond to changes in damage, and may cause much greater relative changes as the spell’s power surpasses (or becomes less than) a foe’s Magick Defense.
Secondary effects
- See also: Elemental Debilitation
The secondary effects of attacks or spells based in one of the five Archmagicks such as certain debilitations and effects are not necessarily the same as their corresponding elemental attributes; an archmagick spell may inflict a non-archmagick physical debilitation.
For example:
- The spell Comestion does Fire based damage and may inflict Burning, however only the initial spell damage is archmagick based. The Burning damage is a Fire-based physical debilitation. As such items providing elemental fire resistance, such as the Ring of Gules, do not protect against Burning, but they will mitigate some damage from Comestion. (Conversely the Rose Ring usually prevents burning but does not reduce damage from the spell itself)
Neutral magick and Non-archmagicks
Neutral Magick is magick not in any of the five archmagicks — it is produced from unechanted Magick Bolts, Focused Bolt, and Magick Agent — the damage of such attacks is not reduced by any Elemental Resistance. A few other spells may also produce neutral magick — one such is Great Sacrifice which initially strikes with a dark magick bolt, but an shockwave which follows lacks any element and is purely magickal.
Non-Archmagick (such as in the description of the augments Morbidity or Resistance) just refers to ways of inflicting debilitations without the use of magick — such as through creature bites, or melee attacks with special weapons or arrows. It is synonymous with Non-magickal.
Notes
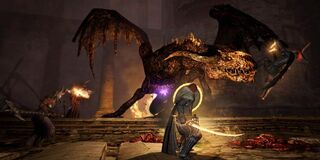
Cursed Dragon at the top of the steps in the Midnight Helix. The illumination comes from a couple of Magick Archer’s explosive rivets lodged in its heart.
- The Cursed Dragon does not use wing flap attacks like other Dragons. As a consequence Stability is only of use against the Cursed Dragon’s aerial fly by.
- The Cursed Dragon’s breath may rot meat and vegetables, but its breath can be oddly beneficial as well. An Egg or Ambrosial Meat can be turned immediately into a Golden Egg or Sour Ambrosial Meat when exposed to Cursed Dragon’s breath. Store such items in an Airtight Flask to preserve, as further breath attacks will rot the egg or meat.
Randomly appearing necrophagous Cursed Dragon can spawn in mid-air and fall, which may be sufficient to kill a low level or badly equipped character by crushing them.
If the Cursed Dragon is encountered together with another dangerous enemy, such as in Midnight Helix or Tower of Treasons Repaid, they may fight each other — although the other foe won, they sometimes fail or are unable to hit the chest crystal needed to finish off the Dragon, which then requires the Arisen to step in. Experience is not awarded for creatures killed by the Cursed Dragon, though loot can still be gathered.
The Cursed Dragon tries to kill Barroch
- If the Cursed Dragon is engaged in the Duskmoon Tower prior to Barroch being removed from the area (possible by using a Rancid Bait Meat), Barroch might catch the aggro of the Cursed Dragon randomly. It’s recommended to bring a Fighter with Shield Drum or a Warrior with War Cry
Barroch is invulnerable and even if he is constantly hit or poisoned by the Cursed Dragon, he cannot die.
, or equip any weapon or skill that can be used to knock it down the sky.
The Cursed Dragon is more supple than might be supposed. It is able to enter areas that appear impossibly small. For example, it can climb all the way to the top of the stairs in the Midnight Helix leading to the Ward of Regret. It will immediately slide down unless it is staggered by a critical blow that causes it to writhe. In that case, it will remain at the top of the stairs.
- (Exploit) It is possible to «farm» Cursed Dragons, for details see .
- As opposed to other Dragons, destruction of the Cursed Dragon’s horns or wings will lack the distinctive impact effect. In addition the Cursed Dragon’s model won’t update like other dragons, but its hitbox will.
Notes
- The eliminator foot pin and stomp attack has 35,000 attack power (blunt) plus 150 magick power (neutral) — it is thought to be the strongest single attack in the game.
- Its appearance recalls the Minotaur — «a mythical creature portrayed in Classical times with the head and tail of a bull and the body of a man or, as described by Roman poet Ovid, a being ‘part man and part bull’.» (Source : Wikipedia:Minotaur)
- (BUG) ps3, xbox360, pc If an Eliminator and its target are on separate elevation levels when the Eliminator attacks with Foot Stomp, the hammer will not hit the character as the attack can only affect characters on its own elevation. Other enemies can push the Eliminator out of the way whilst it is preparing Arc of Deliverance, causing it to miss.
- (BUG) Hammer Frenzy attack has improper hitbox resulting in Eliminator hitting even targets located 1m away from the final blow.
Trivia
- The Wight’s voice in-game is treated as a Sound Effect.
- When casting Unholy Anodyne, the Wight speaks a phrase in an unknown language.
- The Wight in the Chamber of Anxiety speaks in English and an unknown language when casting spells and also has the most health of any Wight in game with 3 full bars of health and slightly higher defenses, albeit it is still weaker than a standard Lich.
- Wights will often laugh if the Arisen or his/her Pawns are hit by its attacks, most commonly if hit by Levin.
- During the Main quest Deny Salvation, the Arisen will see two Salvation magick users being turned into Wights, which gives an insight of what is required to become one. They are stabbed with a mysterious dagger and dragged to an eldritch abyss-like vortex from which they then emerge as Wights.
- Wights sometimes state that they are in pain and wish to be destroyed by adventurers, which is ironic as they cast deadly magicks against the party.
- Summoned creatures may sometimes try to attack their master. Additionally the minions summoned by the Barta Crags Wight may be affected by the Maelstrom it casts.
Как выйти из тюрьмы? Как сбежать из тюрьмы?
Если вы попали в тюрьму при выполнении квеста «Вызывая подозрение» (Arousing Suspition), то ждите, когда к вам придёт герцогиня. Она извинится и передаст ключ. С его помощью откройте тюремную камеру с правой стороны и выберитесь из тюрьмы.
В редких случаях, когда вас бросают в камеру, в инвентаре остаются отмычки (если у вас было их огромное количество). Используйте их, чтобы открыть двери камеры. Отмычки можно легко и просто создать из оков и куска руды. Оба этих предмета легко найти в тюрьме. Нужны будут, как минимум, две отмычки.
Но самый простой способ выйти из тюрьмы — заплатить взятку.
Included content
Dragon’s Dogma: Dark Arisen is the re-release of the original game containing massive new content. The game was revealed at the 2012 Tokyo Game Show. This release contains the full original Dragon’s Dogma game, with all original Downloadable Content (bonus quests and cosmetic items pre-loaded; armor and weapons available to buy from merchants), plus new additions such as new enemies, quests, locations, character customization, weapons and armors.
Owners of the original Dragon’s Dogma will receive 100,000 Rift Crystals, an Eternal Ferrystone and the Gransys Armor Pack consisting of six brand new costumes for free upon purchasing Dragon’s Dogma: Dark Arisen.
For those that missed Dragon’s Dogma the first time around, Dragon’s Dogma: Dark Arisen provides the opportunity to start their journey from the very beginning before tackling the all-new content.
Attacks
| Attack | Type | Description |
|---|---|---|
| Poison Breath | Mag/Spec | A massive stream of poison is let loose from its mouth. Can cause Poison, and Curse. The Cursed Dragon can use this move while moving forward or backing away from its target, and may also attack whilst hovering.
The poison breath has a chance to rot any perishable items. |
| Cursed Breath Assault | Mag/Spec | If under 50% health and grounded, the dragon will rear up and inhale, slowly turn to face the Arisen, and prepare a massive poison bomb attack. It will then roar, knocking back pawns and the Arisen who are not under cover including climbers.
The dragon then spits a poison bomb, which explodes after a few seconds into several small poison bombs which can inflict Curse, Poison or Torpor in addition to heavy damage. This attack may also rot perishable items. |
| Dive | Phys | Hovers, then performs a gliding lunge from the air. |
| Charge | Phys | Charges at a target on the ground. |
| Grab (Arisen) | Phys | The Arisen is grabbed and then slammed into the ground. |
| Grab (Pawn) | Spec/Status | A Pawn is grabbed and then slammed into the ground.
The Cursed Dragon will rarely try to seize control over the pawn, causing Possession. |
| Stomp Attack | Phys | A powerful attack with its feet, staggers targets. |
| Sweeping Backhand | Phys | A backhanded slap with either one of its front claws. |
| Tail Sweep | Phys | A powerful spinning attack with its tail, knocks targets off their feet. |
| Tail Lash | Phys | If the Arisen or pawns linger near or under the tail, it may whip back and forth for high damage with knockback. |
| Dragon Roar | Spec/Status | A mighty roar that may inflict Possession on all pawns within range. |
| Biting Assault | Phys | An onslaught of three powerful bites meant to catch fleeing enemies. |
| High Lassitude | Mag/Status | One or more area-of-effect sigils are created, inflicting Torpor on those who remain within it. |
Overview
- «A wandering merchant who travels the length of the peninsula. He is always on the lookout for rare items.»
Reynard is a traveling peddler, selling his wares throughout the main settlements of Gransys. He can also provide enhancing of equipment.
Reynard is first encountered shortly after meeting Rook and exiting Cassardis for the first time during the main quest «Upon a Pawn». He will be found on Seabreeze Trail on the path to The Encampment, and will need rescuing, from a group of Goblins, if one would like trade with him later. As he will perish during this assault if the Arisen or their Pawns do not intervene in time to save him.
Once the Arisen arrives in Gran Soren, if saved, his escort quest, The Peddler’s Petition, to accompany him to the Greatwall Encampment becomes available, which can be acquired from the notice board inside the Union Inn in Gran Soren.
Reynard may also supply affidavits of dubious provenance during the quest «Trial and Tribulations».
Reynard’s backstory is uncovered during the quest «Search Party»; which involves gathering several items for him scattered around Gransys. In return, his inventory of purchasable equipment will expand with each returned item.He will then sell rare items of clothing, armors, and enchanted weapons that may not be found elsewhere.
During Post-Game, the quest «Committed to Memory» requires collection of 10 pieces of Gran Soren Rubble, which he sells.
Overview
The Dragonforged is found in a cave under a set of standing stones at Hillfigure Knoll, in the Northface Forest. He is accompanied at all times, and only by his faithful pawn The Fool, who has come to closely resemble him. Supposedly a man who faced a dragon long ago, he is the only man who knows how to read Dragonspeak.
The Dragonforged is an Arisen from long ago — he created the warrior drawing on Hillfigure Knoll to draw Arisen to him, and seeks to guide any Arisen who come to him. A headless spear and shield can be seen in his cave, and on the knoll itself can be found the Signs of Valor, former spearheads used as daggers — it seems that all these were once the Dragonforged’s weapons, and the drawing on the hill likely depicts himself.
An Arisen also, his arms are burnt black — likely the reason for his namesake of «Dragonforged» is that his hands and legs underwent the process.
There are very few who know of the existence of this man and none knows the truth of his identity. There is only one thing that they know for sure about this puzzling individual: he knows more than anyone else living about dragons.His name and his ties are unknown. Equally mysterious is how he came to possess his considerable familiarity with dragons. However he came about it, the breadth of his knowledge is undeniable. He knows things that no person on the earth should know.No one else can say if the things which he says are true. Some consider him to be nothing but a fabricator of myths and lies. Still he does seem to know something about dragons and so—since his connection with the terrible beasts was the only fact that anyone alive knew about him—he came to be known only as the Dragonforged.
The Dragonforged’s Tale.