Explore plugins
Содержание:
- Usage[]
- Как создать блок в Майнкрафте
- Overview
- The SDK wizard
- Функции MCreator
- Поиск картинки для гравировки на плоттере.
- Engine branch
- Conclusion
- Step 2: Set up your Text Editor
- Создаем G-code для плоттера в программе Carbide Create.
- Step 3: Set up Forge
- Как установить MCreator
- Step 1: Set up Java Developer Kit (JDK)
- First steps with Forge
- Contraption Controllers[]
- Creating a mod with XBLAH’s Modding Tool
- Step 8: Test your Mod!
- What Can Kids Mod in Minecraft 1.12.2?
Usage[]
Power Generation
When an Encased Fan is placed facedown directly over a heat source (Fire, Lava, Magma Block, active Blaze Burner, Soul Campfire, or a Campfire) and powered by Redstone, it will provide 64 units of Kinetic Stress at 4 RPM.
This setup is tied with a Windmill Bearing attached to a single block of Wool as the most compact power source available in Survival mode.
Currently, the Encased Fan cannot use soul fire for generating power.
Pushing and Pulling Entities
When powered by , an Encased Fan creates an air stream that extends several blocks in front of it. This air stream pushes entities away from the fan or pulls entities towards it depending on the direction of the rotation that the fan receives. Powering an Encased Fan with faster rotational force will cause its air stream to be stronger and faster.
Bulk Item Processing
When the air stream of an Encased Fan passes through Lava, Fire, or Water, the air stream downstream will apply to items Bulk Blasting, Bulk Smoking, and Bulk Washing recipes, respectively. These recipes are applied to item entities when they sit in the air stream, whether they are in the world, on a Mechanical Belt, or on a Depot. These recipes can be applied to multiple items at once.
Bulk Item Processing Speed
All forms of Bulk Processing (Smoking, Blasting, and Washing) process items at the same speeds. However, different stack sizes take a different amount of time to process, as listed below:
| Item count in a stack | Processing time | Maximum belt speed |
|---|---|---|
| 1-16 | 7.5 seconds | 2.0 RPM |
| 17-32 | 15 seconds | 1.6 RPM |
| 33-48 | 22.5 seconds | 1.2 RPM |
| 49-64 | 30 seconds | 0.8 RPM |
Note that if a recipe’s output is also a valid input for a different recipe (such as Cobblestone → Stone → Smooth Stone), the second recipe will start being processed immediately after the previous one is finished. Use Depots with filtered Brass Funnels, Mechanical Arms with filtered outputs, or Mechanical Belts set to the correct speed (as listed above).
Bulk Item Processing Recipes
- Bulk Smoking will apply any recipe that can be applied in Smokers.
- Bulk Blasting will apply any recipe that can be applied in Furnaces
Warning: Passing incompatible items through Bulk Blasting will incinerate them.
but not Smokers.
- Bulk Washing will apply any recipe listed below:
| Input | Output | Recipe | |||
|---|---|---|---|---|---|
| 1 Bucket | 1 Water Bucket |
|
|||
| 1 Concrete Powder (any color) | 1 Concrete (same color) |
|
|||
| 1 Crushed Ore | 10 Nuggets
5 Nuggets (50% chance each) |
|
|||
| 1 Glass (stained) | 1 Glass (clear) |
|
|||
| 1 Glass Pane (stained) | 1 Glass Pane (clear) |
|
|||
| 1 Gravel | 1 Flint (25% chance)
1 Iron Nugget (12% chance) |
|
|||
| 1 Ice | 1 Packed Ice |
|
|||
| 1 Limestone | 1 Weathered Limestone |
|
|||
| 1 Magma Block | 1 Obsidian |
|
|||
| 1 Red Sand | 3 Gold Nuggets (12% chance each)
1 Dead Bush (5% chance) |
|
|||
| 1 Sand | 1 Clay Ball (25% chance) |
|
|||
| 1 Soul Sand | 4 Nether Quartz (12% chance each)
1 Gold Nugget (2% chance) |
|
|||
| 1 Wheat Flour | 1 Dough |
|
|||
| 1 Wool (dyed) | 1 Wool (white) |
|
Как создать блок в Майнкрафте
Хотя инструмент переполнен функциями и возможностями, начинать творческий путь стоит с малых достижений. Вот инструкция по MCreator, призванная облегчить процесс подготовки нового блока:
- Первый шаг – подготовка рабочего пространства с помощью кнопки, изображающей плюсик и расположенной на панели быстрого доступа слева;
- В появившемся меню необходимо выбрать вариант Block (Блок) и выбрать название для будущего ресурса или декоративного элемента. Вводить текст рекомендуется на английском языке (поэкспериментировать над переводом помогут плагины и расширения);
-
Дальше предстоит разобраться с оформлением блока. Предусмотрен вариант с загрузкой текстур файлом (поддерживаются основные форматы изображений) или же подготовкой оформления вручную через встроенный редактор. Вне зависимости от выбора менять дизайн предстоит с помощью 6 квадратов, обозначающих грани блока в развертке.
Если оформление одинаково со всех граней, то достаточно заполнить цветом или изображением лишь левую часть (Left) – остальным значение передается автоматически.
- Не обойтись и без настройки характеристик: MCreator разрешает выбирать тип рендера, задавать прозрачность (Transparency), менять параметры «твердости» (Hardness), влияющей на скорость добычи, взрывоустойчивой силы (Resistance), способов выпадения (Dropping Properties) и свойств земли, редстоуна, пропускной способности.
- Переход между каждым шагом сопровождается нажатием на кнопку Next. Если необходимо вернуться назад – необходимо выбирать Back на панели быстрого доступа.
- Последующие шаги подготовки нового блока связаны с вместимостью и способами компоновки в инвентаре (сколько блоков вмещается в ячейку, максимальное количество стаков). Дополнительно предусмотрена возможность стирать блок после разрушения: достаточно снять галочку с пункта Drop items from inventory when block destroyed.
- Процесс подготовки нового блока заканчивается на этапе выбора параметров генерации (Generation Properties). Разработчики MCreator предлагают выбрать, куда добавлять блок (биом, примерная высота, тип мира – стандартный, нижний), в каком количестве и объеме, необходимы ли специальные обозначения редкости. Каждый из пунктов меню подбирается с помощью выпадающих меню, а потому знать значения и дополнительную информацию необязательно – инструмент подскажет, куда нажимать.
информация о новом блоке
MCreator – не единственный представитель жанра: схожие по замыслу инструменты периодически появляются в сети. Но где-то необходимо знать языки программирования или подбирать подходящую версию под Minecraft, а где-то не обойтись без дополнительной подготовки. MCreator призван помочь каждому реализовать задуманное в полуавтоматическом режиме: справятся даже новички.
Вам будет интересно:
Блокировка интернет-ресурсов на территории Украины
Стала доступна предзагрузка обновления 1.10.1.1 WOT
Инвайт-код для WOT на сентябрь 2018
Как работает маскировка в World of Tanks
Overview
Mods (short for ‘modifications’) can modify or add items, blocks, entities, and much more.
Presumably, you already have an idea for a mod you want to create. If you simply want to add custom advancements, functions, loot tables, structures, recipes or tags to your game, look into how to make a Data pack, which does not require programming. Or look into how to make a resource pack if you simply want to customize textures (colors and designs), models, music, sounds, languages, splashes, fonts, or the end poem.
Or perhaps you want to ‘fork’ a favorite mod to update for newer versions of Minecraft. In any case, this guide will eventually cover only the most basic elements of creating an item and creating an entity (a moving thing like a villager, sheep, zombie, etc.), and distributing the resulting mod package.
Minecraft mods consist of jar files (example: yournewmod.jar) which contain class files, JSON files, and image files, to name a few of the most common.
- JSON files are a means of detailing the characteristics of objects used by Java class files. JSON is much simpler than Java. You will need a text editor such as Notepad++, Vim, or Emacs to read or create JSON files. You probably already have a basic text editor on your computer, but there are many advantages to using other ones instead.
With a Java Development Kit installed, and the IntelliJ Integrated Development Environment to manipulate Java with, you now have the tools to develop custom software that can be used in a variety of applications. While working on a mod, continue working through Java tutorials. The lessons will enable you to put your ideas into action, while the ideas will make the lessons more interesting and memorable.
Things you are not to do
There are some things that you should be careful to not do when creating a mod. Keep this list in mind:
- Don’t release Minecraft versions or modifications that allow you to play without having bought Minecraft from Mojang Studios.
- Don’t release the de-compiled source code of Minecraft in any way.
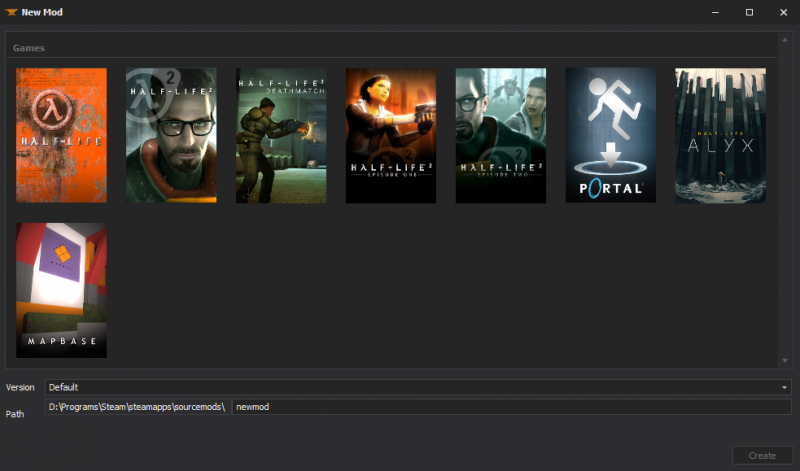
The SDK wizard
Project type
- This section only applies to Half-Life 2 Mods!
When you start the wizard, you will have to choose which project to work with.
- Half-Life 2 Single Player
- Projects for Episode One (2006) or Two (2007). If you do not own Ep1/2 this option will be greyed out.
- Half-Life 2 Multiplayer
- Projects for Half-Life 2: Deathmatch. This option is only available if you own Half-Life 2: Deathmatch; otherwise it will be greyed out.
- Multiplayer mod from template
- A specially-created SDK project that allows you to configure settings such as if your mod is team based, or if you have abilities such as sprinting and prone. This option does not require Half-Life 2: Deathmatch.
- Source code only
- Dumps the code without creating an actual mod. This option is handy if you are just creating a server plugin.
Whichever option you choose, you get the same actual source code files (even if you didn’t own one or another game). You also get an «everything» solution which includes a collection of development tools.
Mod Information
The first option on this page is where you want the source code extracted to. The second is the name you want to use, which also defines the output folder for your compiled content (does not appear if you chose source code only).
Функции MCreator
Интерфейс MCreator перегружен кнопками, контекстными меню и панелями быстрого доступа, а еще представлен лишь на английском языке. Мгновенно освоиться у новичков не выйдет (даже с учетом всплывающих подсказок и рекомендаций), но 3-4 часа проведенные за экспериментами принесут долгожданные плоды. А какими станут результаты – зависит непосредственно от выбранных функций:
- MCreator разрешает в полуавтоматическом режиме изобретать новые блоки, освещение для помещений, декоративные предметы, новые жидкости и топливо. Каждому подготовленному элементу инструмент разрешает присваивать новые характеристики и дополнительные значения через встроенное меню;
- Панели с кнопками, расположенными в верхней, нижней и боковой частях интерфейса настраиваются: кнопки перетягиваются, ползунки скрываются. Дополнительно предусмотрен выбор комбинаций горячих клавиш для распространенных действий;
- Встроенный графический редактор в MCreator адаптирован для подготовки текстур, моделей и изображений, необходимых для наполнения блоков, предметов, сторонних элементов, вроде оружия. Ни размеры подбирать, ни цвета не придется – достаточно выбрать подходящий рабочий формат в Image Maker;
- Поддерживает плагины и расширения, предназначенные для настройки искусственного интеллекта, подготовки генераторов и рецептов, карт и наборов с текстурами. Сторонний контент часто автоматизирует рутинные действия и предлагает подходящие решения для реализации идей;
- Подготовка каждого мода Майнкрафт начинается с проработки основ: предстоит выбрать место появления (биом, высота, мир), разобраться с визуальными изменениями под дождем и снегом, настроить цвет или даже подобрать элементы рецепта для крафта. Каждый из пунктов выбирается через панель с параметрами, где достаточно расставлять галочки и плюсики;
- Каждый раз начинать подготовку модификаций и стороннего контента совсем необязательно: MCreator предлагает сразу обращаться к «базе» с текстурами, 3D-моделями, спрайтами, структурами и эффектами. Предусмотрен даже раздел со звуками. А потому достаточно выбрать исходники и приступить к экспериментам и поиску новых идей.
Поиск картинки для гравировки на плоттере.
В поиске нужных картинок для гравировки, нам поможет поисковая система «Яндекс». В строке поиска вбиваем фразу «картинки для гравировки лазером».
После чего переходим в «Яндекс картинки». Конечно, можно искать сразу в «Яндекс картинках». Для более качественного поиска настроим фильтр, во вкладке «Тип» выберем «С белым фоном».
После сортировки нам выдаст результат: черные картинки с белым фоном. Из данного набора, можно нарисовать на плоттере любую картинку, но лучше искать сегментные изображения. Сегментные картинки состоят из отдельных частей, которые не пересекаются с другими и имеют небольшие размеры, относительного общего размера изображения. Такие картинки красиво гравируются на плоттере и лазерном гравировальном станке.
Нажимаем на кнопку «Открыть», для выбранного изображения. Оно откроется в новом окне, на черном фоне.
После чего кликаем по картинке правой кнопкой мыши и выбираем «Сохранить изображение как …», выбираем место куда сохранить. Если у вас браузер не спросил куда сохранить файл, то сохранение произойдёт в автоматическом режиме в папку «Загрузка».
Engine branch
Before starting a mod you need to choose which version of Source you will use. Change the SDK’s engine version to the one you want.
- Source 2006
- Outdated — Original Half-Life 2: Episode One mod. Only included for backwards compatibility reasons.
- Source 2007
- Outdated — Original Orange Box mod.
- Source 2009
- Outdated — Updated Orange Box mod. You cannot make a mod for Source 2009; you can make a content-only mod of a 2009 game by following .
- Alien Swarm (via Alien Swarm SDK)
- The oddball of the bunch. Alien Swarm is totally free to play and its SDK includes source code, but it’s source code is for a top-down shooter. It also lacks many of the HL2-compatible code’s peripheral tools and cannot access HL2’s content.
- Source 2013
- In 2013, Valve phased out the Source SDK with the release of SteamPipe. With this change, they updated the source code to the latest version of the Source-1-Engine for the HL2-based engine branch. This time around, the source code is not made available via an SDK launcher, but is instead hosted on Github. See Source SDK 2013 for more information.
Note: At this time, CS:GO is the only Valve-made Source Engine title with 64-bit support, and is only 64-bit on MacOS and Linux. (By extension, this means that only mods based on CS:GO will be able to work on MacOS Catalina and later.)
Warning: Your Engine Version in the Source SDK must match the Engine branch of your mod! Failing to do this will result in Source SDK tools being unable to load required resources.
Conclusion
If you enjoy Minecraft Modding and want to take your skills further, CodaKid has a series of courses that can teach you how to make your own custom creature, biome, dimension, insane explosions, and special effects, and more!
Our courses even include messaging and screen share support from live engineers if you ever get stuck, and our courses even come with a two-week free trial!
We hope you enjoyed The Ultimate Guide to Minecraft Modding with Java in 2019. If you enjoyed our Minecraft modding tutorial, we’d love it if you could share it with friends.
If you have any questions or comments, please leave them below!
Happy Minecraft Modding!
BONUS: Check out our latest guide How to Make your own Minecraft Server. A super fun project!
Step 2: Set up your Text Editor
Before we begin Minecraft modding, we’ll need to download some tools.
First, for this guide, we are going to download the Eclipse IDE, one of the most popular professional text editors for Java in the world.
To download the installer CLICK HERE and look for the Get Eclipse IDE 2020-06 Download area that looks like this:

Click the Download 64 bit button and the next page will appear where you can download. Click the Download button shown and wait for the Eclipse file to finish downloading.

Find the executable file in your download file and open it to launch the Eclipse installer.

When the launcher opens, select the Eclipse IDE for Java Developers.

Then on the next window, keep the default install location and then click the INSTALL button.

The next window will appear and you need to accept the agreement for Eclipse.

Then the next window will prompt to make sure you accept the license Agreement.
Checkmark the “Remember accepted licenses” box and accept the Eclipse Foundation Software User Agreement.

Once this is accepted, you are almost done with the install.
Just accept the Eclipse Foundation certificate as shown in the image below.

Once this is done, Eclipse will be downloaded and ready for when we need to use it to write our code.
The next step is going to be installing the Java Developer Kit which will let our code work properly with Minecraft.
Создаем G-code для плоттера в программе Carbide Create.
Для того чтобы создать G-code для плоттера, воспользуемся программой Carbide Create. Данная программ позволяет создавать G-code для фрезерных ЧПУ станков. Для наших целей её тоже можно использовать, но с определёнными ограничениями, о которых расскажу по мере их возникновения.
Скачать программу Carbide Create.
Для того чтобы скачать программу, в поиске «Яндекс» указываем название программы «Carbide Create». Переходим на сайт разработчика.
Прокрутив страницу ниже, вы увидите заголовок «Carbide Create CAD/CAM Software». Нажимаем на кнопку «See Carbide Create», чтобы подробнее почитать о программе.
После чего вы получите письмо, на указанный ранее электронный адрес. В письме будет ссылка на скачивание программы «Click here to download Carbide Create».
После нажатия на которую вы сможете скачать программу для вашей операционной системы. К сожалению, для Linux версии нет.
Создание G-Code в программе Carbide Create.
Запускаем программу Carbide Create и выполним настройки. Для этого нажмем на иконку шестеренки, в блоке кнопок «Setup».
В открывшемся окне первым делом нужно настроить единицы измерение «мм», внизу окна и нажать на кнопку «Ок». Затем повторно открыть данное окно и произвести настройки размера рабочего поля станка. Поднятие оси Z, толщину заготовки и нулевую точку, в левом нижнем углу. Сохраняем настройки.
Затем загрузим векторное изображение, которое мы создали в программе Inkscape. Для этого в меню выбираем «File-> Open…».
Выбираем файл «Пример1» и нажимаем на кнопку «Открыть».
Чтобы начать работать с нашим изображением выделяем его.
На панели «Transform» находятся инструменты, которые позволят перемещать, вращать, изменять размер изображения.
Для создания G-Code необходимо перейти во вкладку «Toolpaths». Здесь на панели «2D Toolpaths», можно выбрать вид обработки. Нас интересует «Controur».
В открывшемся окне настройки обработки, нужно выбрать инструмент обработки. В программе обширная библиотека фрез. Выбираем любую с максимальной скоростью обработки, так как вручную задать скорость обработки мы не можем. Это один из основных минусов данной программы для создания кода, для плоттера. Но при этом большой плюс для составления управляющей программы для фрезерного станка.
После выбора инструмента, нужно указать высоту по оси Z и обработку по линии, и нажать на кнопку «Ок».
Обработка по контру создана. Сейчас нам нужно создать заштриховку. Для этого будем использовать операцию выборки для фрезерного станка.
В окне настройки, указываем параметры как на картинке. Это позволит сделать обработку максимально быстро.
Мы добавили 2 операции обработки, в конце каждой операции указанно ориентировочное время выполнения в минутах.
Для создания G-Code нажимаем на кнопку «Save GCode», указываем название файла «Пример1.nc» и сохраняем его.
G-Code готов, сейчас можно проверить что у нас получилось, но для этого понадобится управляющая программ для ЧПУ станка.
Step 3: Set up Forge
Next you will need to download the 1.12.2 version Minecraft Forge, as this will allow us to mod Minecraft 1.12.2. The instructions shown here should work for any Minecraft version from 1.12.2 onwards.
You can find the download link HERE, and just follow the instructions we’ve laid out below.
On this page you should see the latest and recommended version for Forge. Download the Recommended version Mdk (Mod Development Kit) file for 1.12.2 as shown.

You’ll be taken to Forge’s advertisement redirect. You don’t need to click on anything but the “Skip” button in the top-right corner, highlighted in red below.

Once this is downloaded, find it in your downloads folder, right click on the zipped up folder and then select Extract All…

On the next window click the Extract button.

This is going to be our project folder. So we want to make a copy and rename and move it to a new location on our computer.
We recommend putting a copy in your Documents folder or on your Desktop.
Right click and copy and paste the unzipped forge folder in a location you want and make sure to rename it to something descriptive.
In this example we will be naming it ForgePractice.

We have the Forge folder set up and are ready to create our new project!
Как установить MCreator
Распространяется набор инструментов для разработки модификаций в виде стороннего программного обеспечения, устанавливаемого не в каталог Minecraft, а в отдельную директорию, откуда в дальнейшем запускается для разработки нового контента. Переносить новые предметы, текстуры или декоративные элементы предстоит уже после, через специальное меню и раздел Build & Run. Сначала же предстоит разобраться непосредственно с установкой:
- Дважды нажать на дистрибутив MCreator левой кнопкой мыши и дождаться загрузки инсталлятора;
- Принять соглашение, кликнув по кнопке I Agree;
- Выбрать директорию для распаковки файлов MCreator. Разработчики рекомендуют не менять значения, выбранные по умолчанию (C, Program Files);
- Если установка прерывается и поверх интерфейса инсталлятора появляется ошибка Error Opening File For Writing, то сначала стоит попытаться нажать на кнопку Retry, а после – загрузить и установить Java и Java Development Kit 8;
- Ярлык MCreator появится на рабочем столе и в меню «Пуск», а набор инструментов для разработчиков Майнкрафт модов станет доступен для запуска.
Скачать программу для создания модов для Майнкрафт
СКАЧАТЬ с Modsfire
СКАЧАТЬ с Google Диск
Step 1: Set up Java Developer Kit (JDK)
We will need to download the Java Developer Kit that will let our Minecraft Modding in Eclipse work correctly.
You can find the download link HERE for JDK 8. The version of JDK you need is JDK 8 to work properly with Minecraft Modding.
The download page should automatically detect your platform and give you the correct download. The version I am downloading that is shown in the picture is for Windows 64-bit. However, you can click “Other platforms” to find versions for other operating systems. Click the “Latest release” button to begin your download.
Now the download of the executable file will start.
Once this is finished, find the file in your downloads folder and run the executable to install the JDK.
Run through the pop up window guide to install the JDK for your computer and click on each next keeping the default settings until the JDK finishes installing.
You will need to agree to the End-User License Agreement (EULA) to continue.
Let Java run its installation until it is finished.
Now that JDK is finished, we can set up our code editor in the next step.
First steps with Forge
A note about placeholders
This tutorial will use «You» to represent the User profile you are logged in with; if you copy-paste paths from this tutorial, be sure to replace «You» with your own Windows username. This tutorial will use «yournewmod» to represent sections you should replace with the mod name you choose for your project.
3. Copy key files to your project folder
Open the forge-1.16.5-…-mdk folder (with or without unzipping it first) and copy-paste the following 5 files from this folder[more information needed] to the project folder you created in the first step:
- the folder
- the folder
3½. A note about mappings
There are two different sets of mappings available for method names — «MCP» community-based mappings, and «Official» mappings based in part on the official Obfuscation maps (though class names are different for technical reasons). The default in the MDK has recently been changed to ‘official’, but this tutorial will use the MCP mappings for now because function parameter names are not available in the official mappings.
Change the following line in line 34
mappings channel: 'official', version: '1.16.5'
to
mappings channel: 'snapshot', version: '20210309-1.16.5'
On line 51 of ExampleMod.java, change to (or simply comment or delete the line)
5. Designate the JDK
6. Set up workspace
No Dependencies needed to be Installed. Move to next step as new update in Forge command setupDecompWorkspace is not needed
7. Configure Run settings
After refreshing gradle, open the gradle panel and double-click the «genIntellijRuns» entry in the «fg_runs» folder. This will create new run configurations that allow your mod to be run. Next, open the «Edit configurations» window of Run settings and look approximately halfway down, for «Use classpath of module.» Click on its dropdown field, and select the option that ends with , then click Apply. If the settings you just finished editing were for the Minecraft Client, click on Minecraft Server and repeat the steps to set the classpath.
You can now select and run in the run configuration drop down menu. This will start the Launcher with your mod included. When you get to the landing menu, you can check whether your mod is present.
Contraption Controllers[]
- Depending on the use case, different controllers can be used for mounting your structure. Some push, some pull, some rotate and some do it all at once.
- These blocks have specific spaces where the anchor of the structure needs to be, and some can be configured to react differently to being stopped.
Mechanical Piston
Mechanical Pistons are kinetically powered counterparts to Minecraft’s Pistons. As such, they can push a line of blocks in front of them, and if sticky, pull the closest one back.
However, Create’s pistons do not work on their own. They require Piston Extension Poles added at the back, in order to be able to extend. When rotated, the piston will extend exactly as far as poles have been added to the back, rather than just 1 block space.
Rope Pulley
The Rope Pulley moves attached blocks and structures vertically. Use Chassis, Slimeballs or Super Glue to move more than a single block.
When Powered by kinetics:
Starts moving the attached structure.
Speed and direction correlate to the incoming Rotation Speed.
Mechanical Bearing
The Mechanical Bearing is used for rotating larger structures with rotational force.
When Powered by kinetics:
Starts rotating the attached blocks.
Use Chassis, Slime or Super Glue to move more than a single block. Blocks that attach to other blocks, such as levers, torches, or a Mechanical Saw will become part of the structure automatically.
Other attached Mechanical Bearings, if facing along the same axis as the original, will keep their alignment as the original rotates.
Clockwork Bearing
The Clockwork Bearing is an advanced version of the Mechanical Bearing for rotating up to two clock hands according to the current in-game time.
When Powered by kinetics:
Starts rotating the attached structure towards the current hour. If an independent second structure exists in front of the first one, it will serve as the minute hand.
Cart Assembler
When placed on a Rail, the Cart Assembler can assemble and disassemble moving structures onto passing minecarts. Similarly to rotating structures, having a Mechanical Bearing in the structure will cause the attached part to keep the same alignment as the cart moves.
Single Cart Contraptions
Single Cart contraptions as well as Carriage contraptions can carry items, liquids, or mobs, provided they have the correct storage blocks. They can also use the Mechanical Saw, Drill, Harvester, Plough or the Portable Storage Interface to interact with the world.
Carriage Contraptions
Carriage Contraptions are about the same, except their movement is smoother and thus it is easier to walk or ride on them without falling off.
Creating a mod with XBLAH’s Modding Tool
Creating a barebones Source engine mod usually requires more than just creating a gameinfo.txt. Mods based on Half-Life and Half-Life 2 games can be created with the XBLAH’s Modding Tool using an intuitive interface, that creates all the required files and directories. Mapbase mods are also supported.
- When creating Half-life 2 mods, it will replace the default font file so all letters are available, since the stock font file only contains the letters that make Half-Life.
- When creating Mapbase mods, it will include Thexa’s PBR Shaders by default.
This can be accessed within the tool through Modding > New.
Step 8: Test your Mod!
Now to test our mod we need to make sure we have regular Minecraft forge downloaded.
What we were working in was the developer kit for Forge.
Now we need to access the Minecraft Forge client.
Return to the same Minecraft Forge download page we were at earlier.
Now once at this page click the regular install button shown.

Once the download finishes, open the executable file in your downloads folder.

Once this launches, you should see the Forge install window.
Make sure you have Install client selected, and keep the default location and then click OK.

Make sure the Forge client installs successfully and then press OK when it is done installing.

Once Forge is done installing, we need to find our build mod file in our Eclipse project folder.
Open your ForgePractice folder.
Then open the build folder and find the libs folder in here.
This is where our Mod will be.
Right click and rename the modid-1.0.jar to what you want.

Once it is renamed, go ahead and right click and copy the new jar file.

Once the jar file is copied, we need to open the folder that has our mods in it.
Go to the search bar and type %appdata% and open the folder that shows up in the search.

When this folder is open, go to and open the .minecraft folder.

Inside this .minecraft folder, you should see a mods folder, open up this folder.

Next, paste in your mod we copied earlier.

Your mod is all set up to work in Minecraft!
Now we need to launch Minecraft and open the Forge version. Search and Open the regular Minecraft version.
This has to be the Java version of Minecraft.
The Windows 10 or a mobile version of Minecraft will not work.

Once the Minecraft Launcher is opened, go to the Launch Options tab and click Add new.

In the Add New window, Change the version to the release 1.12.2-forge version.
Name it Forge 1.12 or something descriptively similar.

Go back to the main Minecraft News tab and click the drop down arrow next to PLAY and select the new Forge 1.12 launch version we made.
Once this is selected, click PLAY to launch the Minecraft Forge version.

Once Minecraft is loaded, we need to make a new level just like what we did when testing our sword.
Go to Single Player and then Create New World just like we did earlier.

In the settings, change it to Creative Mode and change your World Name.
Once all of this is done, click the Create button and wait for the new Minecraft game to load.

Just like earlier, find your sword in the Creative Tab by clicking “e” on your keyboard and then head to the tab you set your Sword to appear in.
Mine is the Combat tab and as you can see, the custom sword is at the bottom of the list of items.

You’ve officially created your own Minecraft Mod from scratch and loaded it into your own Minecraft game!
Congratulations!
You can make another sword using the same techniques or even challenge yourself to create an Axe or other tool.

What Can Kids Mod in Minecraft 1.12.2?
When it comes to creating Minecraft mods, a sword (or even weapons in general) is barely the tip of the iceberg. You can create so many awesome mods with the Java Developer Kit, Eclipse IDE, and Minecraft Forge. From mods that add thousands of new weapons for you to find and test out in-game to mods that add new cities and new adventures, the sky is literally the limit with Minecraft.
Here’s a quick overview of some of the most popular 1.12.2 Minecraft mods, so you can see (1) how creative Minecraft players can be, and (2) how you can mod almost anything imaginable:
Minecraft Lumberjack – a mod that instantly clears away anything wooden in its path (trees, leaves, logs, etc.)
JurassiCraft mod – a mod based on the Jurassic Park and Jurassic World franchises. Create in-game dinosaurs by extracting DNA from fossils and amber!
1.12.2 MoarFood Remastered – a mod that adds 100+ new and unique types of food
Minewatch Mod – a mod that combines Minecraft with another popular game, Overwatch. It adds playable heroes and usable weapons and armor that follow the look + functionality of Overwatch items.
Five Nights at Freddy’s Mod – a mod that adds new blocks, items, and mobs based off of the characters from another game, Five Nights at Freddy’s
TelePad Mod 1.12.2 – “teleportation made easy!” A mod that allows players to travel over dimensions, back and forth
Item Filter Mod (Advanced Filtering Items) – a practical mod that allows you to add specific filters with the API. This is perfect if you’re trying to comb through thousands of in-game objects in your inventory
Extra Alchemy Mod – a mod that adds hundreds of new useful potions
Xaero’s World Map Mod (Trace Your Footsteps) – a Minecraft 1.12.2 mod that introduces a self-writing fullscreen map to your client. Changes depending on the world/dimension/server
PetCraft Mod 1.12.2 – this mod adds a variety of pets (i.e., dogs, cats, hamsters, etc.) to the game
Guns Mod | Modern Edition – fairly recent mod that adds modern guns (i.e., pistols, shotguns, SMGs) to the game
UFO Mod 1.12.2 (Alien) – exactly as the name suggests; this mod introduces a full-blown UFO invasion into the Minecraft world
Yes, all these are real mods, and, yes, they’re all functional. Created by Minecraft players for Minecraft players, Minecraft modding is honestly one of the best ways the community keeps engaged with the game.
Believe us; once you’ve gotten used to mods, vanilla Minecraft may seem almost limiting (which is crazy, because Minecraft remains one of the most intuitive and extensive sandbox games of all time) in comparison. So when you start creating and downloading mods, we highly recommend you organize your mods folder. It’s very hard to stop at just a few!