Mekanism mod 1.16.5/1.15.2 (high-tech machinery)
Содержание:
- Miscellaneous Notes
- Crafting Recipe
- Usage
- Usage
- Sulfur Dust
- Crafting machines
- Construction steps
- Dusts
- Energy Upgrade
- Starting the Reaction
- Creating basic components / Expanding your power network
- Construction Notes
- Features
- Обрабатывающие машины[]
- Understanding Slots and Sides
- Upgrades
- Speed Upgrade
- Обрабатывающие машины
- GUI
- Customizing Your Configuration
Miscellaneous Notes
- Compatible with oredict steam from other mods such as TE/TF/RC/MFR/Big Reactors.
- The marking of «Limiting» on the vents stat simply means that it is not «optimal ratio». You can have fewer down to your desired steam flow rate.
- Turbine shuts down if internal battery fills with energy. It will restart automatically though you may also vent excess steam to prevent it from shutting down.
- A 5x5x8 turbine design will produce the exact same RF/t as the highest tiered turbine from Big Reactors with the same amount of steam.
- Exact formula to calculate the flowrate of your turbine — understanding is not necessary. Just fill the values and perform the commands:
//Btw — NOTICE AND REMEMBER THIS:
//Math.min => Takes whatever is lower
//structure.lowerVolume is the INSIDE volume with the rotor -> (-> TurbineUpdateProtocol.java:172) and so on…»]
flowrate =
(
   Math.min(
       Math.min(
           TURBINE_STORED_AMOUNT ,
           ↑Math.min(
               structure.lowerVolume
               *
               (
                   TURBINE_DISPENSER_COUNT*GENERAL_DISPENSER_GAS_FLOW
               ),
               TURBINE_VENT_COUNT*GENERAL_VENT_GAS_FLOW
           )↑
       ),
       (
           (
               getMaxEnergy()-getEnergy()
           )
           /
           (
               (GENERAL_MAX_ENERGY_PER_STEAM/TURBINE_MAX_BLADES )
               *
               Math.min(
                   TURBINE_BLADE_COUNT,
                   TURBINE_COIL_COUNT*2
               )
           )
       )
   )
   *
   (
       TURBINE_STORED_AMOUNT /TURBINE_MAX_STORED_AMOUNT
   )
)
/
(
   Math.min(
       structure.lowerVolume
       *
       (
           TURBINE_DISPENSER_COUNT*GENERAL_DISPENSER_GAS_FLOW
       ),
       TURBINE_VENT_COUNT*GENERAL_VENT_GAS_FLOW
   )
Crafting Recipe
MekaSuit Helmet:
| Ingredients | Crafting recipe | ||||||||||||
|---|---|---|---|---|---|---|---|---|---|---|---|---|---|
|
Basic Induction Cell +HDPE Sheet +Polonium Pellet +Netherite Helmet +Ultimate Control Circuit |
|
MekaSuit Bodyarmor:
| Ingredients | Crafting recipe | ||||||||||||
|---|---|---|---|---|---|---|---|---|---|---|---|---|---|
|
Basic Induction Cell +HDPE Sheet +Polonium Pellet +Netherite Chestplate +Ultimate Control Circuit |
|
MekaSuit Pants:
| Ingredients | Crafting recipe | ||||||||||||
|---|---|---|---|---|---|---|---|---|---|---|---|---|---|
|
Basic Induction Cell +HDPE Sheet +Polonium Pellet +Netherite Leggings +Ultimate Control Circuit |
|
MekaSuit Boots:
| Ingredients | Crafting recipe | ||||||||||||
|---|---|---|---|---|---|---|---|---|---|---|---|---|---|
|
Basic Induction Cell +HDPE Sheet +Polonium Pellet +Netherite Boots +Ultimate Control Circuit |
|
Usage
- The MekaSuit like most rechargable Mekanism items has infinite durability, requiring Forge Energy to function instead.
- Every time the player takes damage it uses up some of the electricity in the armor, evenly distributing the charge loss throughout all pieces at once.
- The total charge remaining is shown both when hovering over the suit pieces in the inventory and as a green bar where armor points are usually displayed.
- When worn, the MekaSuit Helmet brings up an Augmented Reality inspired UI within the player’s field of view. It displays the following information to the player:
- Top Left: The remaining charge (as a percentage) of each currently worn armor piece.
- Bottom Left: The current location coordinates (X,Y,Z) of the player, within a simple compass which shows orientation.
- Bottom Right: The current status of modules installed. For example, it will display remaining jetpack hydrogen if the player has the Jetpack Unit installed, or how much food is remaining in the helmet if the Nutritional Injection Unit is installed.
Usage
TODO: Add all Metallurgic Infuser recipes.
Someone with LUA knowledge please finish this \/ -Yutang
| Ingredients | Metallurgic Infuser recipe | |||||||
|---|---|---|---|---|---|---|---|---|
|
|
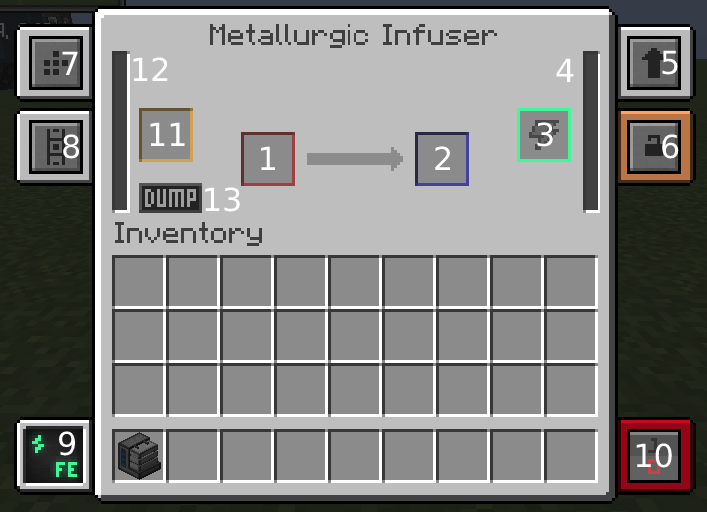
GUI
 |
|
Infusing
In the purple slot (11) the infusion material can be inserted, depending on the recipe for the item you are creating:
- Redstone (Redstone, Block of Redstone or Compressed Redstone)
- Diamond (Diamond Dust or Compressed Diamond)
- Obsidian (Refined Obsidian Dust or Compressed Obsidian)
- Carbon (Coal/Charcoal or Compressed Carbon)
- Tin (Tin Dust)
- Bio Fuel (Bio Fuel)
- Mushroom (Red or Brown Mushrooms)
It will fill up the buffer next to it (12).
The red slot (1) is for the item you want to infuse. Your finished item will then appear in the blue slot (2) when the process is complete.
Energy
TODO: Create global energy explanation page.
If you are powering the Infuser with redstone dust, place redstone in the green slot (3). It will fill up the power buffer right next to it (4).
You can also use items that are charged such as energy cubes and energy tablets, even charged darksteel items from EnderIO can charge machines.
Tabs
TODO: Create global tab explanation page.
The upgrade tab (5) is where you can load up to 8 upgrades of either Speed or Energy that will improve the efficiency of the machine.
Tab (7) is where you go to set up the configuration of the machine. By selecting the corresponding colour on the right hand diagram you can determine which slot an item will move through.
Eg: Selecting the blue colour on the right hand side will output the blue slots (2) item to a chest, pipe or other machine placed on that side. Using this feature allows you to «chain» machines together and have the output of one, become the input of the next machine. Another example would be if you want power to come in from the bottom of the machine you would select the green colour in the bottom slot and connect your power cable to the bottom of the machine.
The energy tab (9) is where you can see information about the energy usage of the machine. Clicking on this tab will change the units of power being used (J/RF/EU/T)
Using tells you how much power per tick is being used. (Non-factory machines will always display their usage even when not working and using power. Factory machines will display correct values.)
Needed tells you how much power is required to fill the power buffer. When the machine is using and receiving enough power this will also display the usage per tick
Sulfur Dust
Sulfur Dust
| Mod | |
| Type |
Dust |
| Durability |
N/A |
| Stackable |
Yes (64) |
Usage
Sulfur Dust by itself is not used in much recipes. It can be used as a substitution for Yellow Dye, and be used to create gunpowder using an Enrichment Chamber. However, what makes it such an important ingredient is its ability to produce Sulfur Dioxide in a Chemical Oxidizer.
Sulfur Dioxide can then be used to produce Sulfur Trioxide when used in a Chemical Infuser with Oxygen.
Sulfur Trioxide can then be used to produce Sulfuric Acid when used in a Chemical Infuser with Water Vapor. Sulfuric Acid is a key ingredient that is used in the Ore Processing system and in Fissile Fuel Production. A Chemical Dissolution Chamber requires Sulfuric Acid and ores to produce Dirty Slurries (an ingredient in the 5x ore processing process), and requires Sulfuric Acid and Fluorite to produce Hydrofluoric Acid (an ingredient in the production of Fissile Fuel).
Pressurized Reaction Chamber Method
A method is to use the Pressurized Reaction Chamber (PRC) with the ingredients Water; Oxygen; Block of Coal/Charcoal or Coal/Charcoal.
Coal/Charcoal
Using Coal/Charcoal will require 100mb of Oxygen and Water, and the process will take approximately 5 seconds/100 ticks (with no Speed Upgrades). Doing so will yield 1 Sulfur Dust and 100mb of Hydrogen.
Block of Coal/Charcoal
Using Block of Coal/Charcoal will require 1,000mb of Oxygen and Water, and the process will take approximately 45 seconds /900 ticks, 9x slower than using Coal/Charcoal (with no Speed Upgrades). Doing so will yield 9 Sulfur Dusts and 1,000mb of Hydrogen.
Gunpowder Method
By using Hydrogen Chloride and Gunpowder in a Chemical Injection Chamber, you can produce Sulfur Dust. You can obtain gunpowder from flint or a vanilla creeper farm.
Flint Method
Putting Flint into a Crusher will produce gunpowder, which can then be used in the Gunpowder Method. You can obtain flint from gravel.
Gravel Method
Putting Gravel into an Enrichment Chamber will produce flint, which can then be used in the Flint method, then the Gunpowder method. You can obtain gravel from cobblestone or digging.
Putting Cobblestone into a Crusher will produce gravel, which can then be used to in the Gravel Method, then the Flint Method, then the Gunpowder Method. You can obtain cobble stone from a simple cobblestone generator or mining.
Crafting machines
- Create Infused Alloy (the basis of all Mekanism Machines), which is made in a Metallurgic Infuser using Redstone as the secondary material and Iron Ingots as the primary material.
- Start crafting Steel Casings, which are crafting components used to create most Mekanism machines.
- You can now create some of the basic machines, such as the Enrichment Chamber, Energized Smelter, Precision Sawmill, and Crusher.
- After that, you can start to work on ore processing by upgrading the basic machines into Factories.
- Move on to tier 2 processing (tripling resource output) by adding the Purification Chamber and Electrolytic Separator.
- Also, you now have the option to create some additional tools and armor that are obsidian and glowstone-based by using the Osmium Compressor.
- Now, you can decide to either move on to further ore processing tiers (such as quadrupling and pentapuling ore yields) or play with the toys and gadgets that Mekanism has to offer, such as the Digital Miner (a configurable, complex machine which can mine blocks beneath itself) or the Atomic Disassembler (Mekanism’s all-in-one mining tool, like the Paxel but instead of durability uses an electronic charge).
Construction steps
- Build the base out of turbine casings and optional structural glass. (must be square)
- Place rotor shafts in the center, from the base to desired height.
- Add turbine blades to the rotor. (two for each rotor shaft)
- Place a rotational complex on top of the rotor.
- Completely fill the interior layer around the rotational complex with pressure dispersers.
- Place electromagnetic coils above the dispersers. They must touch the rotational complex and each other.
- Build the frame (the perimeters of the walls) out of turbine casings. (you may have more empty layers above the coils to make room for more vents)
- Fill the walls, up to the height of the rotor, with turbine casings and/or structural glass and at least 2 turbine valves.
- Fill the remaining walls and ceiling with turbine casings and/or turbine vents.
Dusts
Dusts
| Mod | |
| Type |
Dust |
| Durability |
N/A |
| Stackable |
Yes (64) |
Dusts are the product of the ore refining system.
The Enrichment Chamber turns ores into dusts and dirty dusts into dusts.
| Dust | Dirty Dust Variant |
|---|---|
| Redstone | |
| Glowstone Dust | |
| Iron Dust | Dirty Iron Dust |
| Gold Dust | Dirty Gold Dust |
| Osmium Dust | Dirty Osmium Dust |
| Refined Obsidian Dust | |
| Obsidian Dust | |
| Diamond Dust | |
| Steel Dust | |
| Copper Dust | Dirty Copper Dust |
| Tin Dust | Dirty Tin Dust |
| Uranium Dust | Dirty Uranium Dust |
| Lead Dust | Dirty Lead Dust |
| Fluorite Dust | |
| Charcoal Dust | |
| Coal Dust | |
| Lapis Lazuli Dust | |
| Emerald Dust | |
| Quartz Dust | |
| Netherite Dust | |
| Sulfur Dust | |
| Sawdust | |
| Salt |
Energy Upgrade
Energy Upgrade
| Mod | |
| Type |
Upgrade |
| Durability |
N/A |
| Stackable |
Yes (8) |
The Energy Upgrade, when installed, increases the power capacity of a Mekanism machine, as well as reduce its power consumption per tick.
Crafting Recipe
| Name | Ingredients | Crafting recipe | ||||||||||||
|---|---|---|---|---|---|---|---|---|---|---|---|---|---|---|
|
Glass +Infused Alloy +Gold Dust |
|
The formula to calculate the energy used is DefaultUsage × EnergyMultiplier(2 × SpeedUpgrades-EnergyUpgrades)/8. DefaultUsage is the default energy used by a machine. EnergyMultiplier is a configurable multiplier that defaults to 10.
This table qualifies the rate of energy/speed efficiency with varying amounts of upgrades applied.
| Speed/Energy | 1 | 2 | 3 | 4 | 5 | 6 | 7 | 8 | |
|---|---|---|---|---|---|---|---|---|---|
| 100% | 75% | 56% | 42% | 31% | 24% | 18% | 13% | 10% | |
| 1 | 178% | 133% | 100% | 75% | 56% | 42% | 32% | 24% | 18% |
| 2 | 316% | 237% | 178% | 133% | 100% | 75% | 56% | 42% | 31% |
| 3 | 562% | 422% | 316% | 237% | 178% | 133% | 100% | 75% | 56% |
| 4 | 1000% | 750% | 562% | 422% | 316% | 237% | 178% | 133% | 100% |
| 5 | 1778% | 1333% | 1000% | 750% | 562% | 422% | 316% | 237% | 178% |
| 6 | 3162% | 2371% | 1778% | 1333% | 1000% | 750% | 562% | 422% | 316% |
| 7 | 5623% | 4217% | 3162% | 2371% | 1778% | 1333% | 1000% | 750% | 562% |
| 8 | 10000% | 7499% | 5623% | 4217% | 3162% | 2371% | 1778% | 1333% | 1000% |
Starting the Reaction
The Fusion Reactor will not start on its own. It requires an outside burst of energy from a charged Laser Amplifier and a small amount of D-T Fuel to begin the fusion process. Once the reaction is jump started, it will begin consuming supplied Deuterium and Tritium, creating plasma and generating power.
Initial Fuel
The Hohlraum stores 10 units of D-T Fuel required for the initial reaction. To fill it up, place it into a Chemical Infuser which is combining Deuterium and Tritium. Place the Hohlraum into the Reactor Controller when it contains the required D-T Fuel.
Ignition
The statistics tab details the required ignition temperature for the reaction to begin. To reach this temperature, a Laser Amplifier must be charged with energy from several Lasers feeding into it, and fired into the Laser Focus Matrix. The energy required to start the reaction can range from 600M RF — 800M RF. It must be injected in one big burst to prevent temperature from dissipating, so adding Redstone sensitivity or increasing the minimum energy required by the Amplifier will prevent it from firing prematurely.
With the Hohlraum in the Reactor Controller and enough energy stored in the Amplifier, fire the laser to begin the fusion reaction. If a high enough temperature was achieved, you should immediately see and hear the reactor running. To sustain the reaction, the temperature must not drop below the ignition temperature. Make sure the injection rate is high enough and fuel is constantly being supplied.
Creating basic components / Expanding your power network
You will need to create a few basic crafting components in the Metallurgic Infuser before creating the wires needed to expand your power network, which are made from Steel Ingots.
- Craft a Metallurgic Infuser, and connect it to the Heat Generator. ( Power output via front panel )
- Use the Metallurgic Infuser to create Steel Ingots.
- Insert a few Coal/Charcoal into the Secondary Material Slot (the purple slot on the far left). This will fill up the Secondary Material Slot with Carbon.
- The Secondary Material Buffer (bar on the far left) can’t store more than one type of material at a time, so if another type of material (other than Carbon) has already been added (check by hovering over the Secondary Material Buffer), click the DUMP button to expel it. Note that you will lose that material.
- Place an Iron Ingot inside of the Primary Material Slot (red slot, left of the arrow). If the Metallurgic Infuser is receiving adequate power, it will begin «infusing» the Iron with Carbon, which results in Enriched Iron.
- With Carbon still in the Secondary Material Buffer, place the Enriched Iron in the Primary Material Slot. This will create Steel Dust.
- Smelt the Steel Dusts into Steel Ingots.
- Insert a few Coal/Charcoal into the Secondary Material Slot (the purple slot on the far left). This will fill up the Secondary Material Slot with Carbon.
- Now you can begin expanding your power network so that you can power multiple machines at once. Craft a few Basic Universal Cables (made from 2 Steel Ingots and a piece of Redstone) and create a line of them trailing from your Heat Generator.
Your power network is now ready to accommodate many early-tier machines. If you find that your power needs become more demanding, you can try connecting a few more Heat Generators, some Solar Generators (or its much more expensive and efficient version, the Advanced Solar Generator), Wind Turbines (make sure that they are placed at high altitudes for maximum power), or other various generators that Mekanism has to offer. Remember that Mekanism machines can accept most forms of power from other mods (such as RF or MJ) as well as its own (Joules), so feel free to add other sources of power to your Mekanism power network.
Construction Notes
- Orientation can only be vertical (Unlike BR’s turbine)
- Length and Width (x,z) must be equal.
- Maximum shaft height = min(2xLENGTH-5,14)
- Maximum total height = min(2xLENGTH-1,18)
- Tank volume = LENGTH^2xROTOR_HEIGHTx64,000mB
- Flow rate is determined by tank volume (exact formula inside notes) and vents — whichever is less. Each vent adds 16,000mB/t of flow rate.
- Energy production = FLOWxROTOR_HEIGHTx50RF/7
- Because a taller rotor leaves less room for vents, sometimes heightening the rotor could reduce flow and, therefore, energy.
- 1 coil will support 4 blades. You’ll never need more than 7 coils.
- Interior may ONLY be dispersers, coils, shaft, blades, rotational complex, or air.
- Multiblock will sparkle red on final block placement, otherwise check your assembly.
- Minimal turbine size is 5×5 base with 5 blocks high.
- Maximum turbine size is 17×17 base with 18 blocks high.
Features
Compatability
Compatibility comes first. While Mekanism will run just fine alone, I have spent so very long adding in integration to make Mekanism seem like it blends in perfectly when you have other mods installed. Whether you are powering my machinery with EU, RF, MJ or whatever it is, they will work. IC2 and TE recipes are implemented in my respective machines, and just about everything else will work as well. I like to think of this as one of Mekanism’s best features.
Ore Processing
Ore processor capable of producing 4 ingots per ore
Mekanism features an extremely advanced, extensive ore processing system. From simple machines used to process ores into ingots electronically, to complex chemical-based ore injection used to gain four ingots for every ore mined, Mekanism covers basic smelting, as well as 2x, 3x, and 4x duplication. All machines have configurable input and eject sides, allowing you to have complete control over how you want to manage your machinery. Mekanism also features the Combiner, which allows you to recreate the ores you’ve already processed.
Factories
Elite Factory Interface
Mekanism introduces the concept of «factories,» which are multi-operation machines that can process multiple stacks of ores simultaneously. In a single machine, you can be smelting several stacks of ore into ingots, enriching several stacks of ores into dusts, or crushing several stacks of cobblestone into gravel. The Factories follow base Mekanism tiers, with the Basic Factories processing three stacks at once, the Advanced Factories processing five stacks at once, and the Elite Factories processing seven stacks at once. In other words, the Factory can be seen as seven machines in one in it’s elite tier.
Ores
All Mekanism ores have configurable spawn rates and disable options in the config (Mekanism.config). It’s pretty self-explanatory.
Mekanism is founded off the resource «Osmium» which generates pretty commonly at any Y level below 60. Osmium can be used to create tools and armor, but it is primarily used in the makings of machinery. If you have NEI, you’ll see that you really can’t do much without Osmium.
Mekanism also generates Tin and Copper, both of which can be easily disabled (and I’m assuming many people will since 99% of mods have their own form of tin and copper).
Armor and Tools
Mekanism brings five new sets of armor and tools to the table, as well as the ever-famed Paxel (an all-in-one tool).
However, as Mekanism is a «tech mod,» it has to have some cool techy gadgets. The Atomic Disassembler is an expensive, electronic multi-tool that can be set to mine at different speeds. The Walkie Talkie is a super fancy device that allows for SMP-based voice chat. Can’t forget the Jetpack and Scuba Mask/Tank combination.
Robit
The Robit is a cute little electronic robot that will follow you around and collect item drops for you. He also serves as a portable furnace, workbench, anvil, chest, and spirit lifter.
Mining
Mekanism introduces the «Digital Miner» — an automated mining machine that can sort through terrain and pick out the resources you specify. It uses a filter-based system, and will then go through the range you specify and mine the blocks it needs to.
Dynamic Tanks
Dynamic Tank setup
Dynamic Tanks are the best of both worlds: whatever is in between Multi-Tanks and Iron Tanks. These are multiblock tanks that can be shaped as any rectangular prism (capping at 18x18x18). Use Dynamic Glass, Dynamic Valve, and Dynamic Tank blocks to create a tank fit for you!
Transmitters
Mekanism features ways of transmitting items, fluids, gasses and energy from once place to another, devices we call «transmitters.» Transmitters all have some similar characteristics, and these are as follows:
- Transmitters (excluding the Logistical Transporter) will not function when powered by a redstone signal.
- All transmitters seamless work with Forge Multipart.
- Excluding the Logistical Transporter which obviously behaves differently, transmitters hold buffers that are dependent upon how many transmitters are in the network. For example, if you have two Universal Cables connected together, your network will have a capacity of 20 KJ.
- All transmitters look really cool.
All four Mekanism transmitters
Universal Cable
Capable of transferring, well, universal energy from one place to another. These guys are super fancy and can be configured on their sides to behave differently.
Logistical Transporters
Capable of transferring items and blocks from one place to another. These function identically to RedPower tubes, and have a fully-implemented color-coded sorting system.
Обрабатывающие машины[]
| Изображение | Название | Описание |
|---|---|---|
| Камера обогащения | Простая машина, используемая для обогащения руд путём преобразования одного блока руды в две единицы пыли, а также для выполнения множества других операций. | |
| Осмиевый компрессор | Довольно улучшенная машина, используемая для сжатия осмия в различные виды пыли для последующего создания из них слитков. | |
| Объединитель | Машина, используемая для объединения пыли и булыжника для формирования соответствующей руды. | |
| Дробитель | Машина, используемая для дробления слитков в соответствующую пыль, а также для выполнения множества других операций. | |
| Металлургический наполнитель | Машина, используемая для «наполнения» металлов (как правило) различными материалами, для создания металлических сплавов и других соединений. | |
| Камера очистки | Улучшенная машина, способная перерабатывать руды в три глыбы, выступающая в качестве начальной стадии переработки руды с трёхкратным выходом. | |
| Энергетическая плавильня | Простая машина, служащая в качестве базовой Mekanism-печи, работающей от энергии. | |
| Точная лесопилка | Эта машина используется для обработки древесины и других деревянных предметов, а также для получения опилок. | |
| Химическая инъекционная камера | Сложная машина, способная перерабатывать руды в четыре осколка, выступающая в качестве начальной переработки руды с четырёхкратным выходом. | |
| Герметичная реакционная камера | Улучшенная машина, которая обрабатывает твёрдые, жидкие и газообразные смеси, и создаёт как газообразный, так и твёрдый продукт. | |
| Химический мойщик | Очень сложная машина, которая очищает необработанные расплавленные руды и подготавливает их для кристаллизации. | |
| Формульный сборщик | Машина, использующая энергию для быстрого крафта предметов и блоков с помощью формул. |
Understanding Slots and Sides
Notice in the GUI above that several of the objects have a colored border. These «slots» in the user interface are places where items can be inserted or ejected from the machine. For example, the input (4) is red and the output (6) is dark blue. These are standard input/output colors for Mekanism. You cannot change these colors, but what you can change is which side(s) each slot connects to. Yes, you can connect a single slot to multiple sides! For example, you could set the top of the machine to be the input (red), the right side to be an output (blue) and the back to be a second output (blue). In this configuration, if one output slot was blocked, the machine would try to send an item out the second output.
So how do you configure the slots? Read on…
Upgrades
- Each MekaSuit armor piece supports a variety of different upgrades which give the user various benefits and abilities. Some of these are unique to armor pieces and cannot be installed on other armor pieces. Upgrades are installed using Modules at the Modification Station.
- Once installed, upgrades can be removed and, if the upgrade is not unique, can be reinstalled on other armor pieces by uninstalling it at a Modification Station and putting it on another armor piece as normal.
- Each armor piece can have several modules of the same type installed to it depending on the module type, in some cases up to 8. In this case each additional upgrade will improve the ability/effectiveness of the module upgrade.
- Each module can be uninstalled individually just like machine Upgrades.
- Modules can be toggled through their various modes if they have more than 1 using the appropriate corresponding armor mode switch key.
Speed Upgrade
Speed Upgrade
| Mod | |
| Type |
Upgrade |
| Durability |
N/A |
| Stackable |
Yes (8) |
A Mekanism machine upgrade to make them process items faster, you can install 8 of these in each Mekanism machine. If you were to apply speed upgrades to a factory, the power consumption is accumulative. For example, if each operation were to cost 50J/t, a basic factory with 3 ongoing operations will cost 150J/t. HINT: Upgrade your power setup before upgrading your machines, as the power usage per tick begins to escalate with every speed upgrade applied, requiring more power to complete a single machine process.HINT: If you plan to use Speed Upgrades for a machine, it is advised to also install Energy Upgrades and Gas Upgrades if applicable.
Here’s a tables:
| # of Speed Upgrades | Speed Multiplier | Time per Operation (20 ticks = 1 sec) | Relative Speed | Power Usage | Total Power Usage for each Operation |
|---|---|---|---|---|---|
| 1x | 200 ticks | 100% | 50 J/t | 10,000 J | |
| 1 | 1.33x | 149 ticks | 134.2% | 88 J/t | 13,112 J |
| 2 | 1.78x | 112 ticks | 178.6% | 158 J/t | 17,696 J |
| 3 | 2.37x | 84 ticks | 238.1% | 281 J/t | 23,604 J |
| 4 | 3.16x | 63 ticks | 317.5% | 500 J/t | 31,500 J |
| 5 | 4.22x | 47 ticks | 425.5% | 889 J/t | 41,783 J |
| 6 | 5.62x | 35 ticks | 571.4% | 1,580 J/t | 55,300 J |
| 7 | 7.5x | 26 ticks | 769.2% | 2,810 J/t | 73,060 J |
| 8 | 10.0x | 20 ticks | 1000% | 5,000 J/t | 100,000 J |
Note that every speed upgrade makes the machine 33% faster, and the Power Usage increases with ~77% (33²%), which makes for an increase in power usage for each operation with 33%
Обрабатывающие машины
| Изображение | Название | Описание |
|---|---|---|
| Камера обогащения | Простая машина, используемая для обогащения руд путём преобразования одного блока руды в две единицы пыли, а также для выполнения множества других операций. | |
| Осмиевый компрессор | Довольно улучшенная машина, используемая для сжатия осмия в различные виды пыли для последующего создания из них слитков. | |
| Объединитель | Машина, используемая для объединения пыли и булыжника для формирования соответствующей руды. | |
| Дробитель | Машина, используемая для дробления слитков в соответствующую пыль, а также для выполнения множества других операций. | |
| Металлургический наполнитель | Машина, используемая для «наполнения» металлов (как правило) различными материалами, для создания металлических сплавов и других соединений. | |
| Камера очистки | Улучшенная машина, способная перерабатывать руды в три глыбы, выступающая в качестве начальной стадии переработки руды с трёхкратным выходом. | |
| Энергетическая плавильня | Простая машина, служащая в качестве базовой Mekanism-печи, работающей от энергии. | |
| Точная лесопилка | Эта машина используется для обработки древесины и других деревянных предметов, а также для получения опилок. | |
| Химическая инъекционная камера | Сложная машина, способная перерабатывать руды в четыре осколка, выступающая в качестве начальной переработки руды с четырёхкратным выходом. | |
| Герметичная реакционная камера | Улучшенная машина, которая обрабатывает твёрдые, жидкие и газообразные смеси, и создаёт как газообразный, так и твёрдый продукт. | |
| Химический мойщик | Очень сложная машина, которая очищает необработанные расплавленные руды и подготавливает их для кристаллизации. | |
| Формульный сборщик | Машина, использующая энергию для быстрого крафта предметов и блоков с помощью формул. |
GUI
You access the GUI of the Fusion Reactor by right-clicking the reactor’s Reactor Controller.
Main Screen
Reactor Controller GUI
The text on the main screen of the GUI indicates if the structure is correctly formed or incomplete. This screen also has a single inventory slot, into which you will need to insert a charged Hohlraum in order for lasers to be able to ignite the reaction.
Heat Tab
The Heat tab of the Controller GUI
The two indicators to the left show the temperature of the plasma and the case. The highest of the three on the right shows the internal energy storage and the ones beneath shows the amount of water and steam inside the reactor.
Fuel Tab
The Fuel tab of the Controller GUI
The Fuel tab indicates the amount of fuel and the injection rate. The tanks show, from left to right, the amount of Deuterium, D-T Fuel and Tritium inside. Deuterium and Tritium consumption is equal to injection rate halved, per tick.
Statistics Tab
The Statistics tab of the Controller GUI
The Statistics gives the user various technical information regarding injection rate, max temp, passive generation and steam production.
Customizing Your Configuration
Everything you need is in the Configuration Panel, pictured above. It may look intimidating at first, but for most installations you will only use a couple controls.
Common Controls
Auto Eject (4). This will tell your machine to automatically eject its output item, if there is a suitable inventory to receive it. If there is nothing to receive an item, the machine will hold onto its products. Mekanism machines will not spill your items all over the floor! 🙂 Clicking the A button will toggle the Auto-Eject function on/off.
Mekanism machine output configuration
Slot/Side Assignment (6). This is where you assign a specific colored slot to the sides of your machine. The image of six squares corresponds to each of the six sides. The gray box in the middle is the front, above that (red) is the top. To the left is the left side (orange), to the right is the right side (dark blue). Below the gray square is the bottom side (green), and in the lower left is the back side (also gray). Note that all sides are configured as if you were facing the machine, not from the machines point of view. You can change which slot connects to which side by clicking on the appropriate side. As you click, you will cycle through all available colors. Not all colors will be a valid slot color. So if you wanted to configure your machine like in the example with the top as the input (red) and the right and back sides as outputs (blue), the top and right are already set up, you only need to click the gray box in the lower left a few times until the dark blue color is selected. Done! It really is that easy. Gray is the «no connection» color.
Advanced Controls
Looking to really customize your system? Read on!
- Output Color Frame(3). This will set a colored «frame» around items as they exit the machine. In the example above, all ejected items will have a green frame. Mekanism Logistics Pipes will use this frame color to route the items to a matching-colored destination. If no destination has a matching color, the first available destination inventory will receive the item.
- Input Filter on/off(5). This turns on/off the input filter feature for the machine. If turned on, then machine will only accept items whose color frames match the input filters. If the colors don’t match the filter… they will not be accepted. You can set the input color filters by using…
- Input Color Filters(2). Like the output configuration (6), each of these squares corresponds with a side of the machine. If a color is set for one of these squares, that side will only accept items if they have a matching color frame. So if you want to be sure that coal goes to the Enrichment Chamber and not the Crusher, set a color filter on the output of the machine that ejects the coal, then set a matching color input filter of your Enrichment Chamber. Magic!